Yosemite is a large park, with many different habitats and scenic areas. However, the most famous and accessible part is definitely Yosemite Valley, and within the valley, you’d be hard pressed to find a more appealing hike than the Mist Trail. During a trip with friends last year, I proposed it for our first hike, and my party agreed to try it. In this post, I’ll recount what’s special about the Mist Trail as well as the scenic parts of the valley that you’ll pass on the way to the Mist trailhead.
I actually hiked this trail two weeks beforehand with a group of interns from my company, and rode into the valley in a jeep with the top down. I’m showing posters from that trip, because I was a passenger that time, while I was in charge of driving when I went with my friend group. That time, traffic was absolutely horrendous. We got to the valley only a bit before noon, and were crawling behind traffic on the valley’s loop road. Much worse though, is that all the parking was gone. Our jeep was lucky enough to snag a space after about a half hour, but I used this knowledge to make it urgent that we get to the Mist trailhead before 9 a.m., which was early enough for us to secure parking without worry.
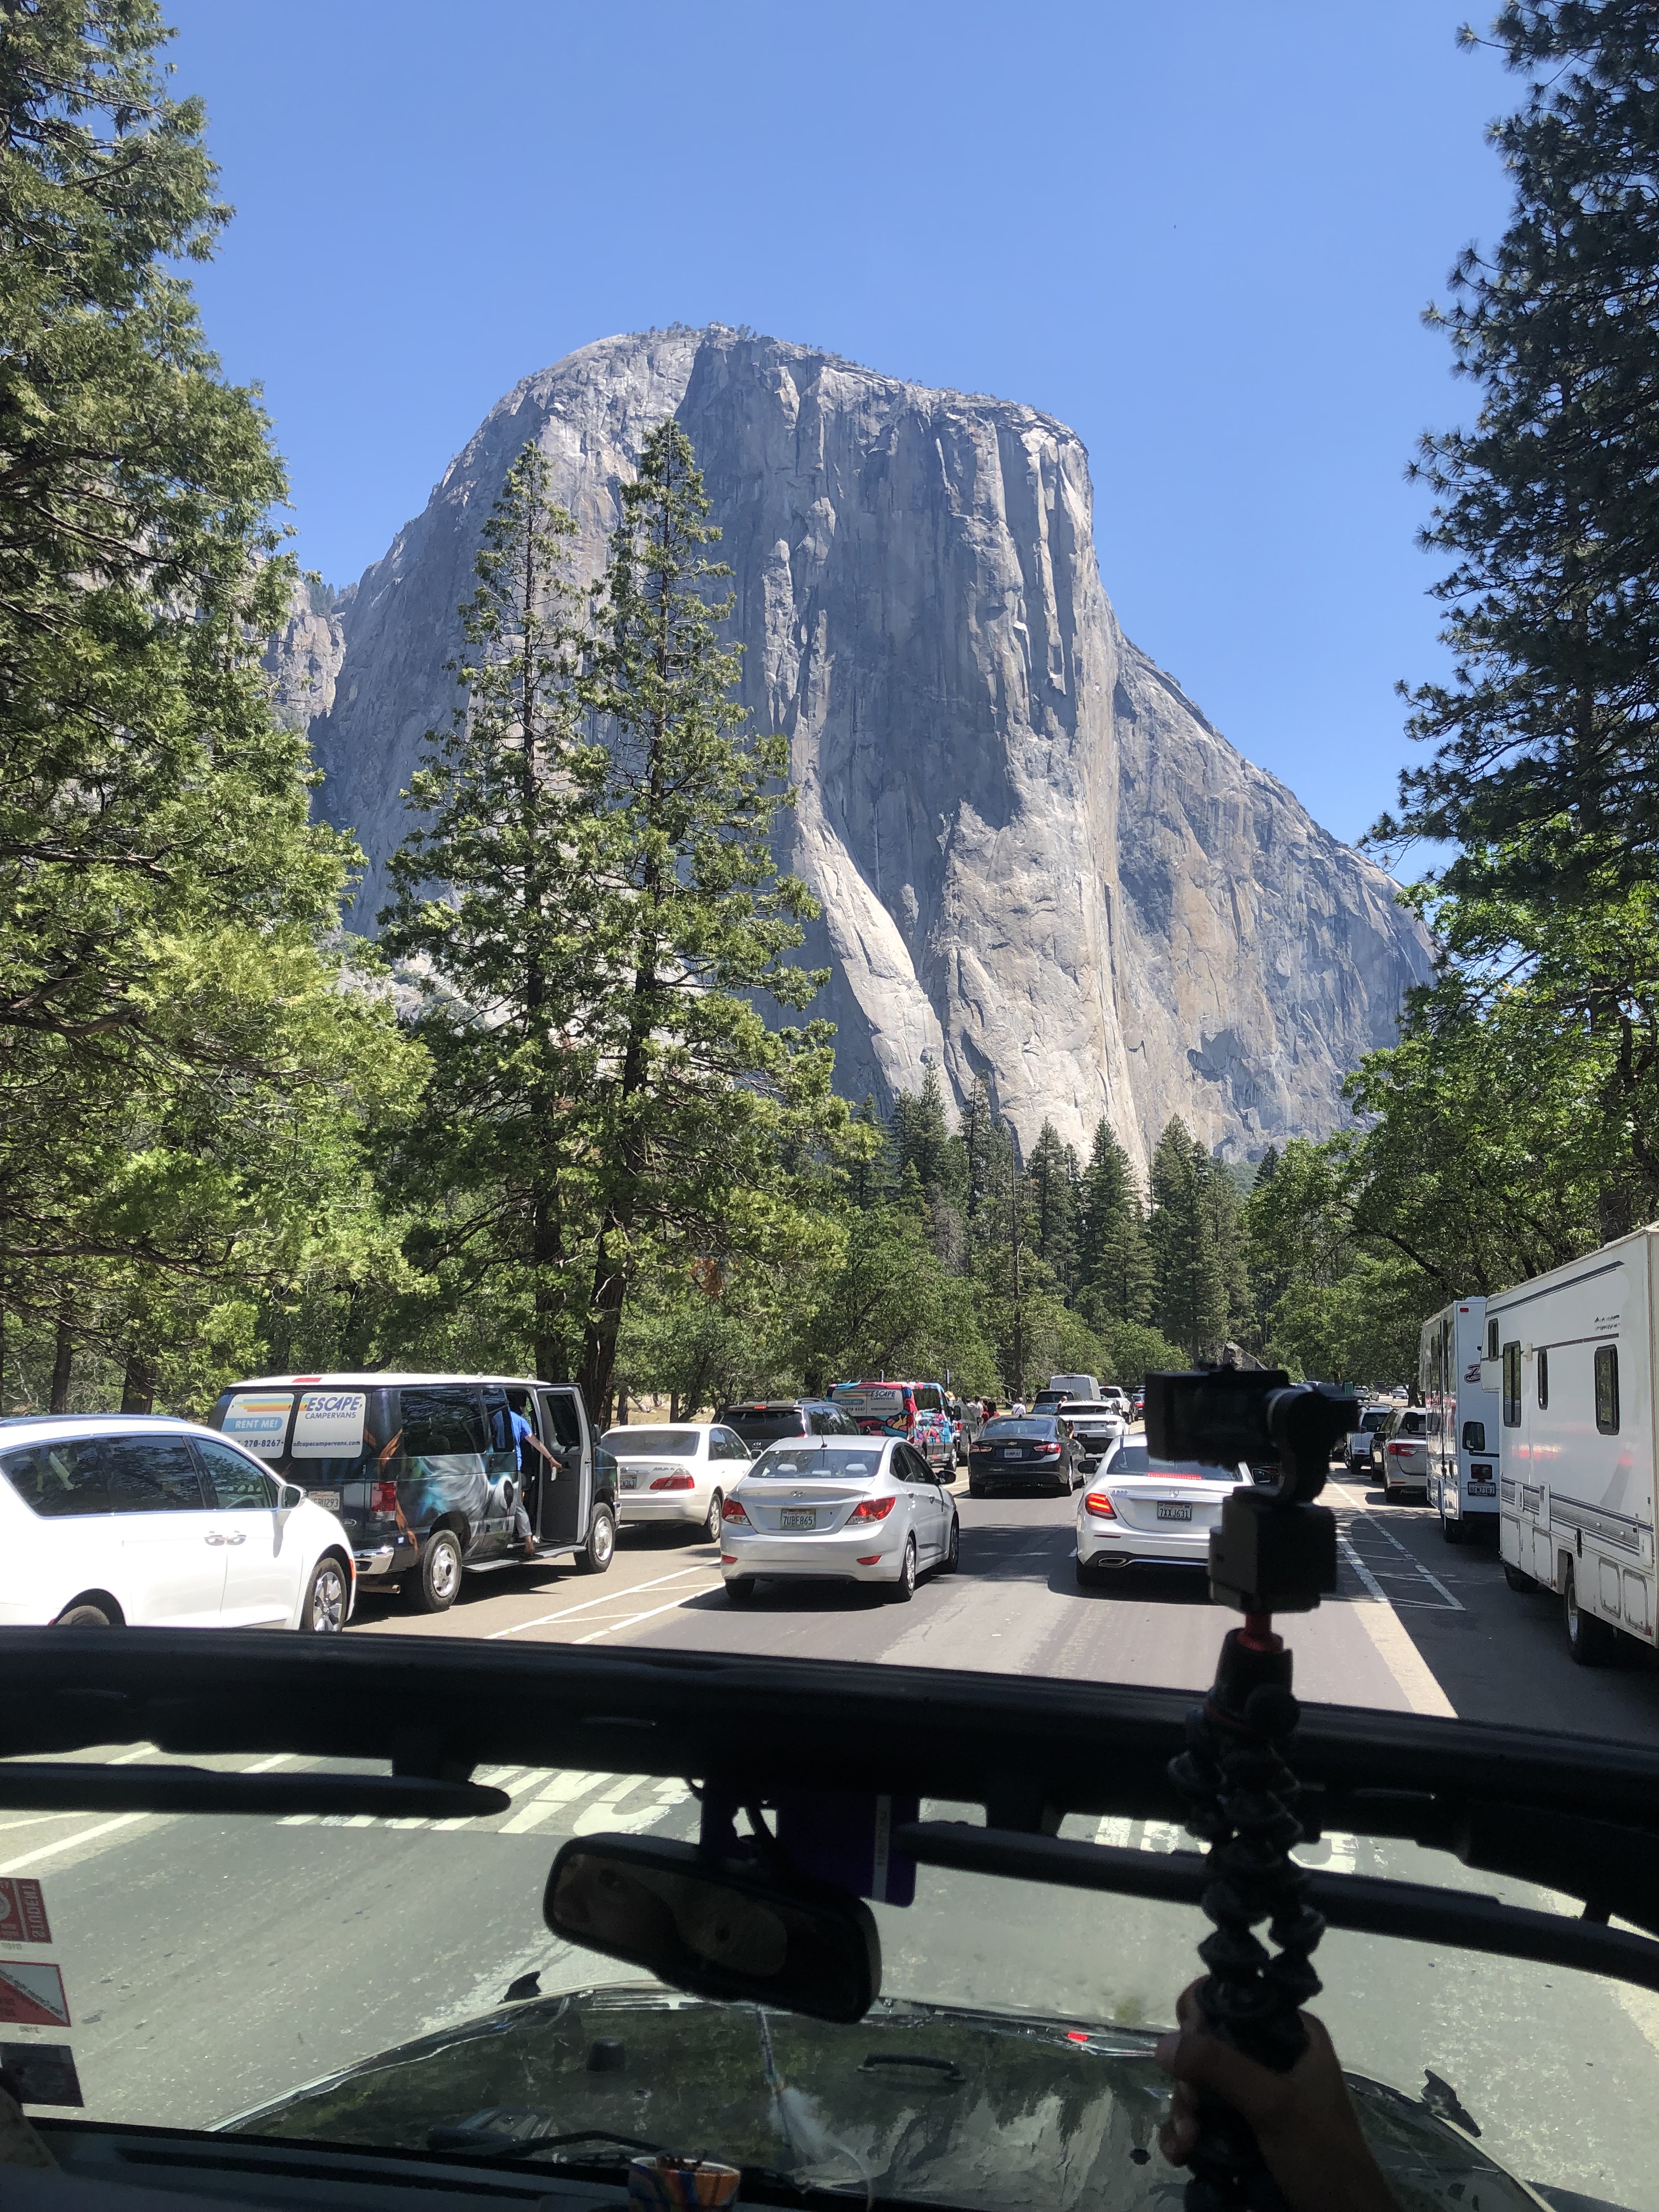
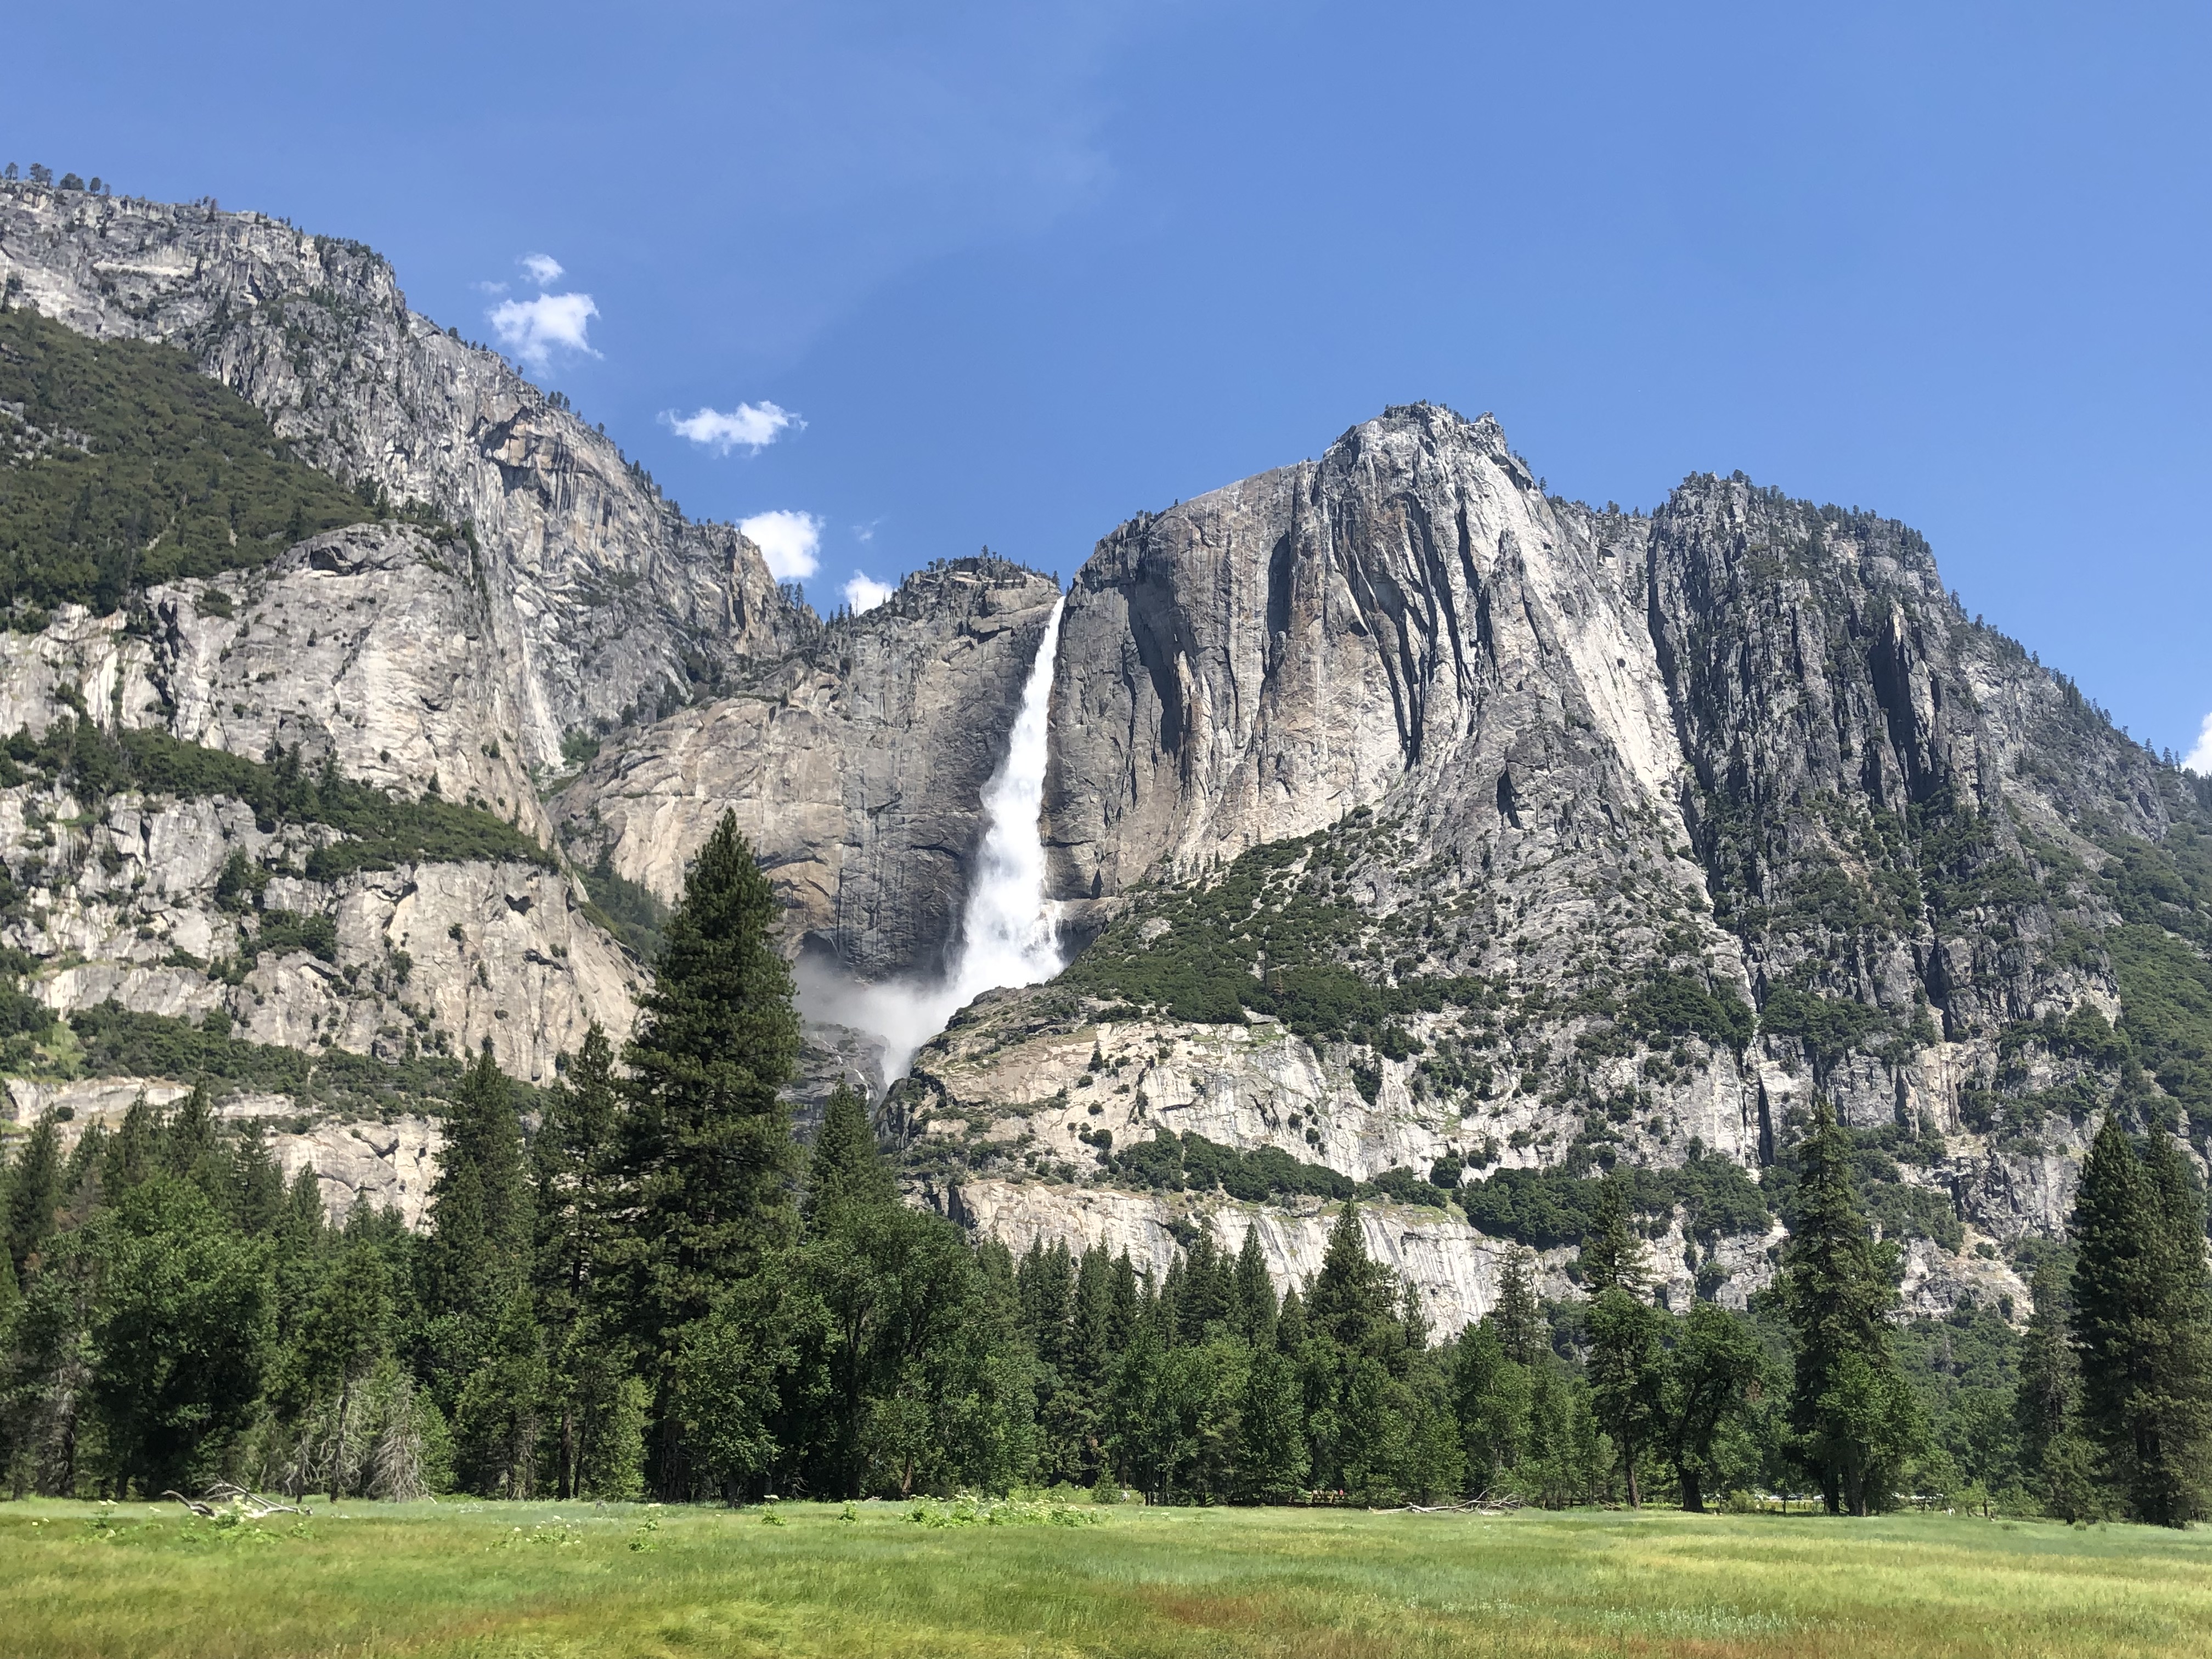
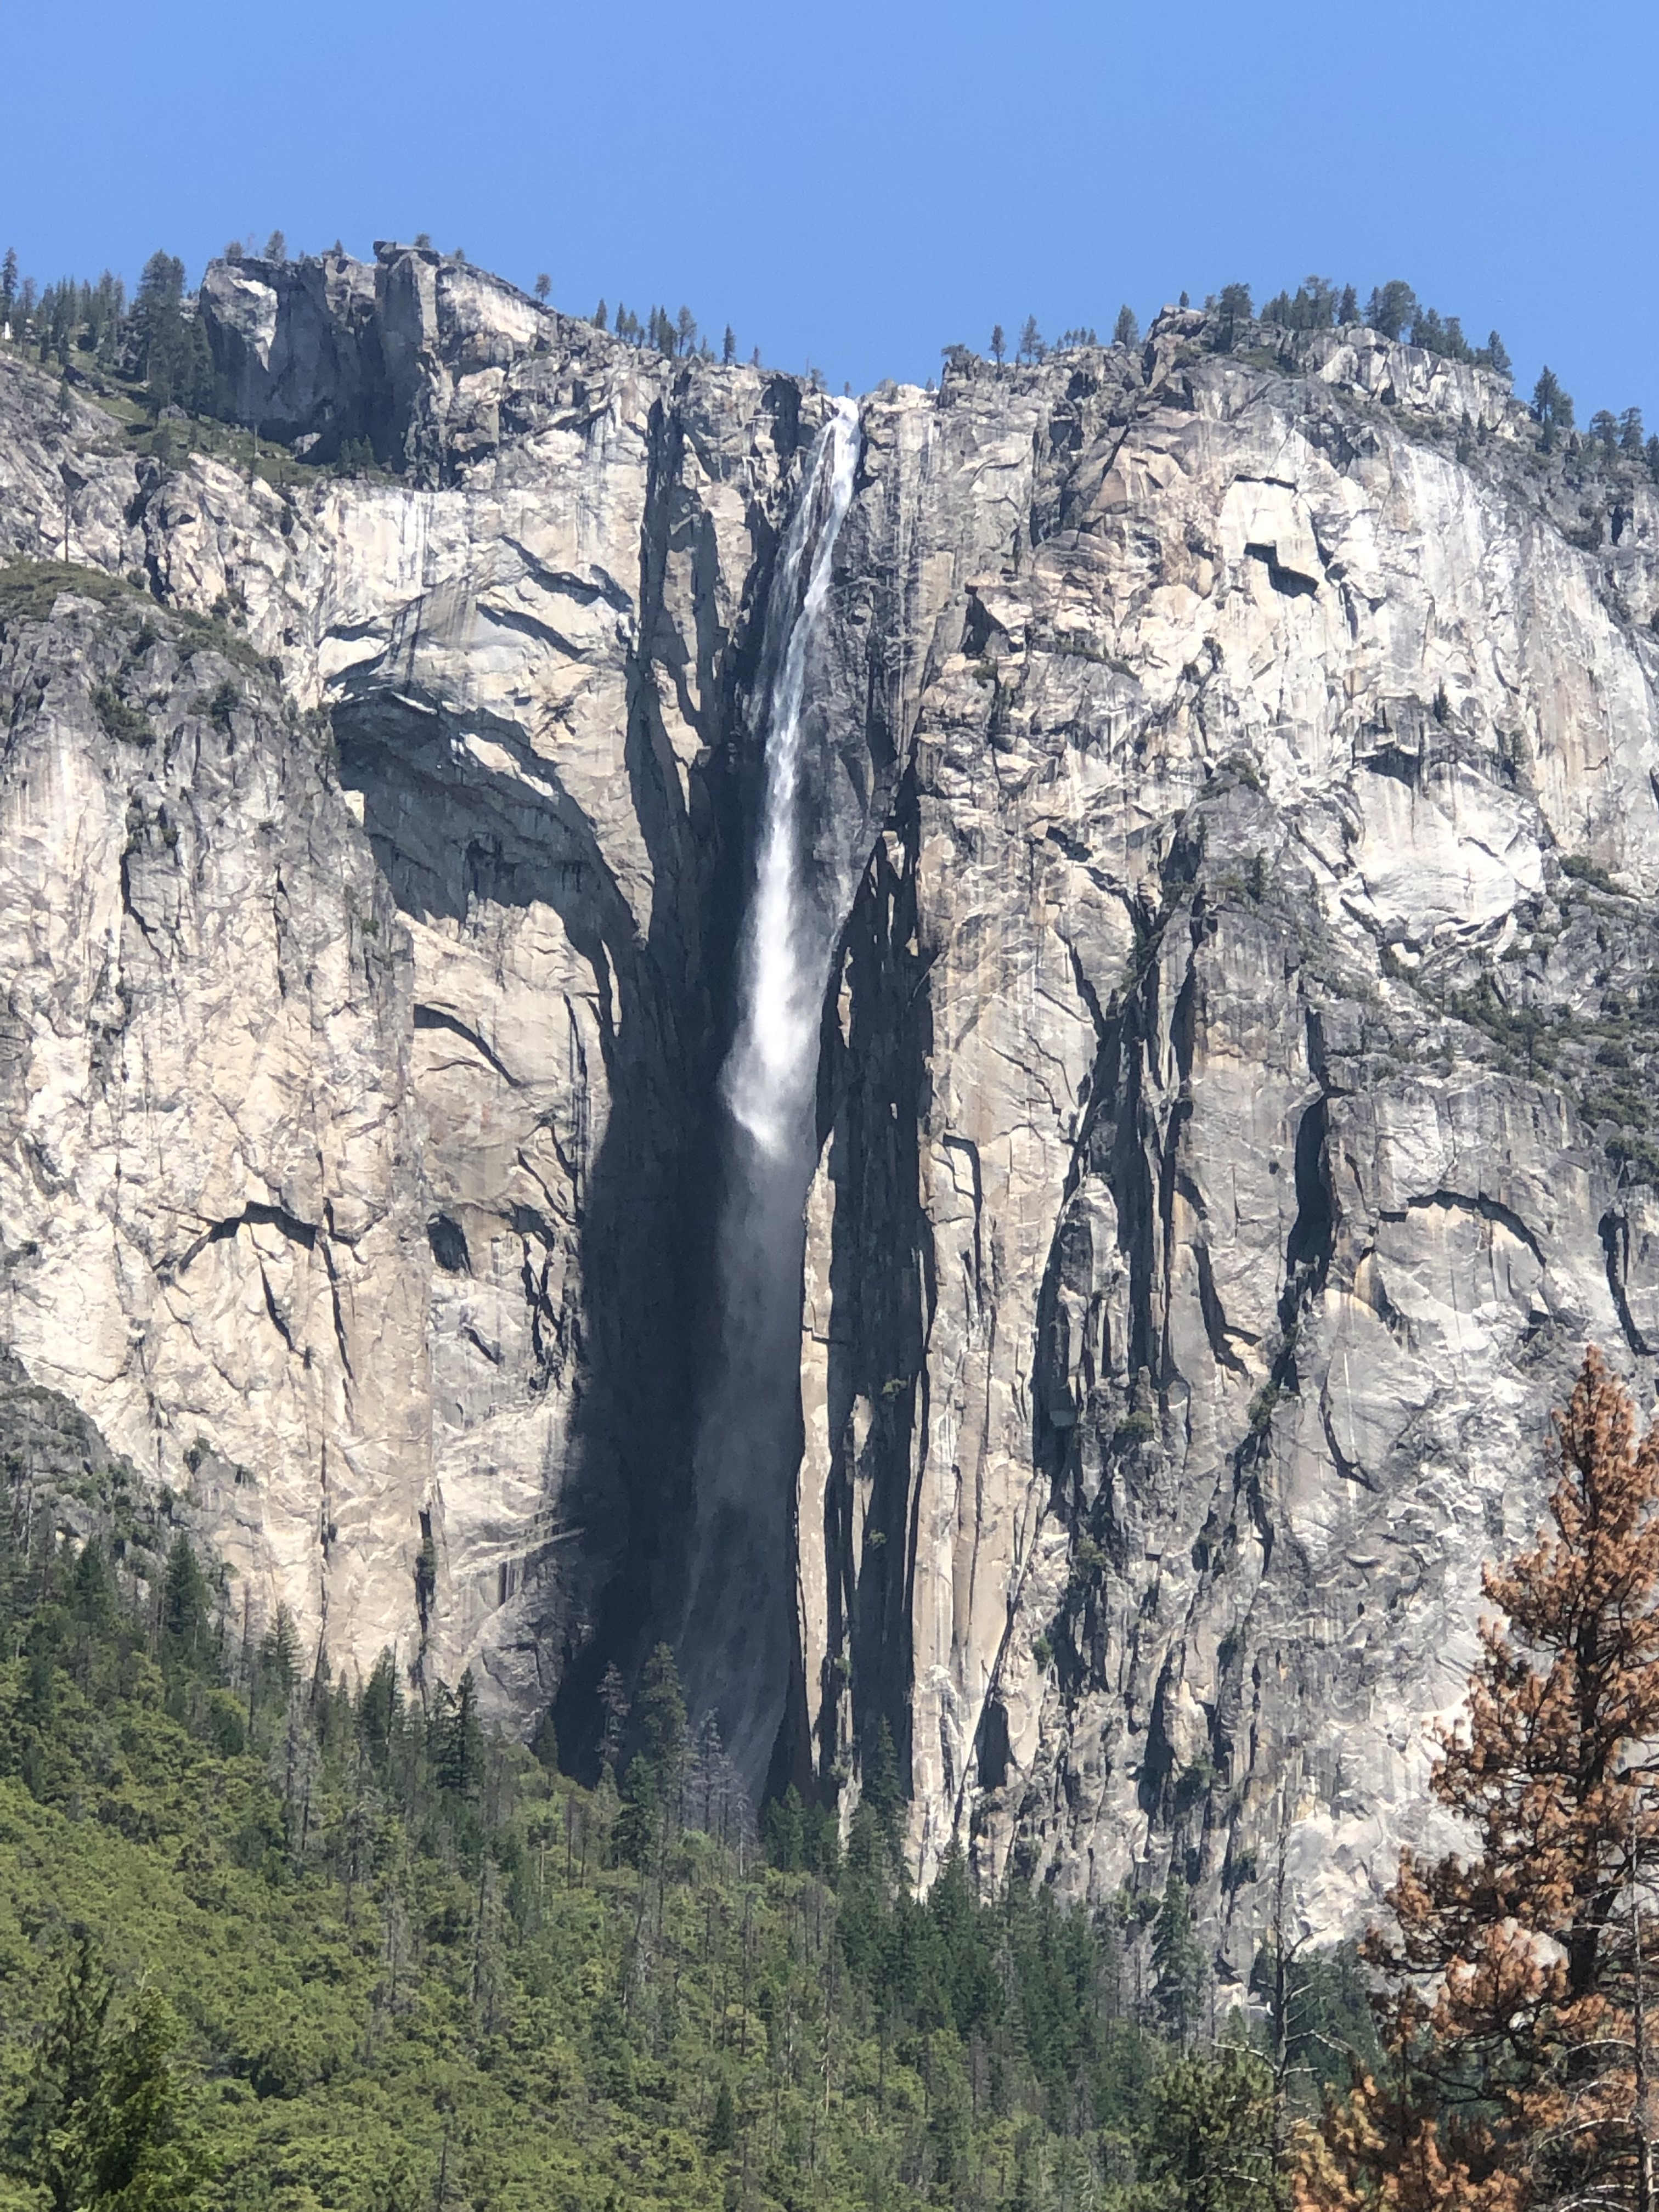
The first landmark that will come into view is the massive edifice of El Capitan. It’s clear from a distance that the cliff face is massive, so you might not be surprised to learn that it’s the highest single cliff drop in the United States. It gained additional notoriety with the advent of the documentary Free Solo. Since the cliff is situated right in front of the valley road, an open-top car is the best way to photograph it this way. Continuing further, you’ll pass by Bridalveil Falls on the right side, which typically has lower flow than some of the valley’s other falls. If you arrive early enough, it’s a short side road and even shorter hike to the base of the falls which is worth doing. The other standout, perhaps the most well known one, is Yosemite Falls of course. Throughout the spring months, the falls are fueled by melting snow and plunge into the valley from a drop that’s the second tallest in the world. Your first opportunity to see the falls will be from across a meadow, like the pictures I took. However, there’s a stop later on where you can walk up to the base of the lower falls, which you may prefer to do. The meadow view is the one where you’ll be able to see the entire waterfall though, so it’s the one I’d recommend the most.

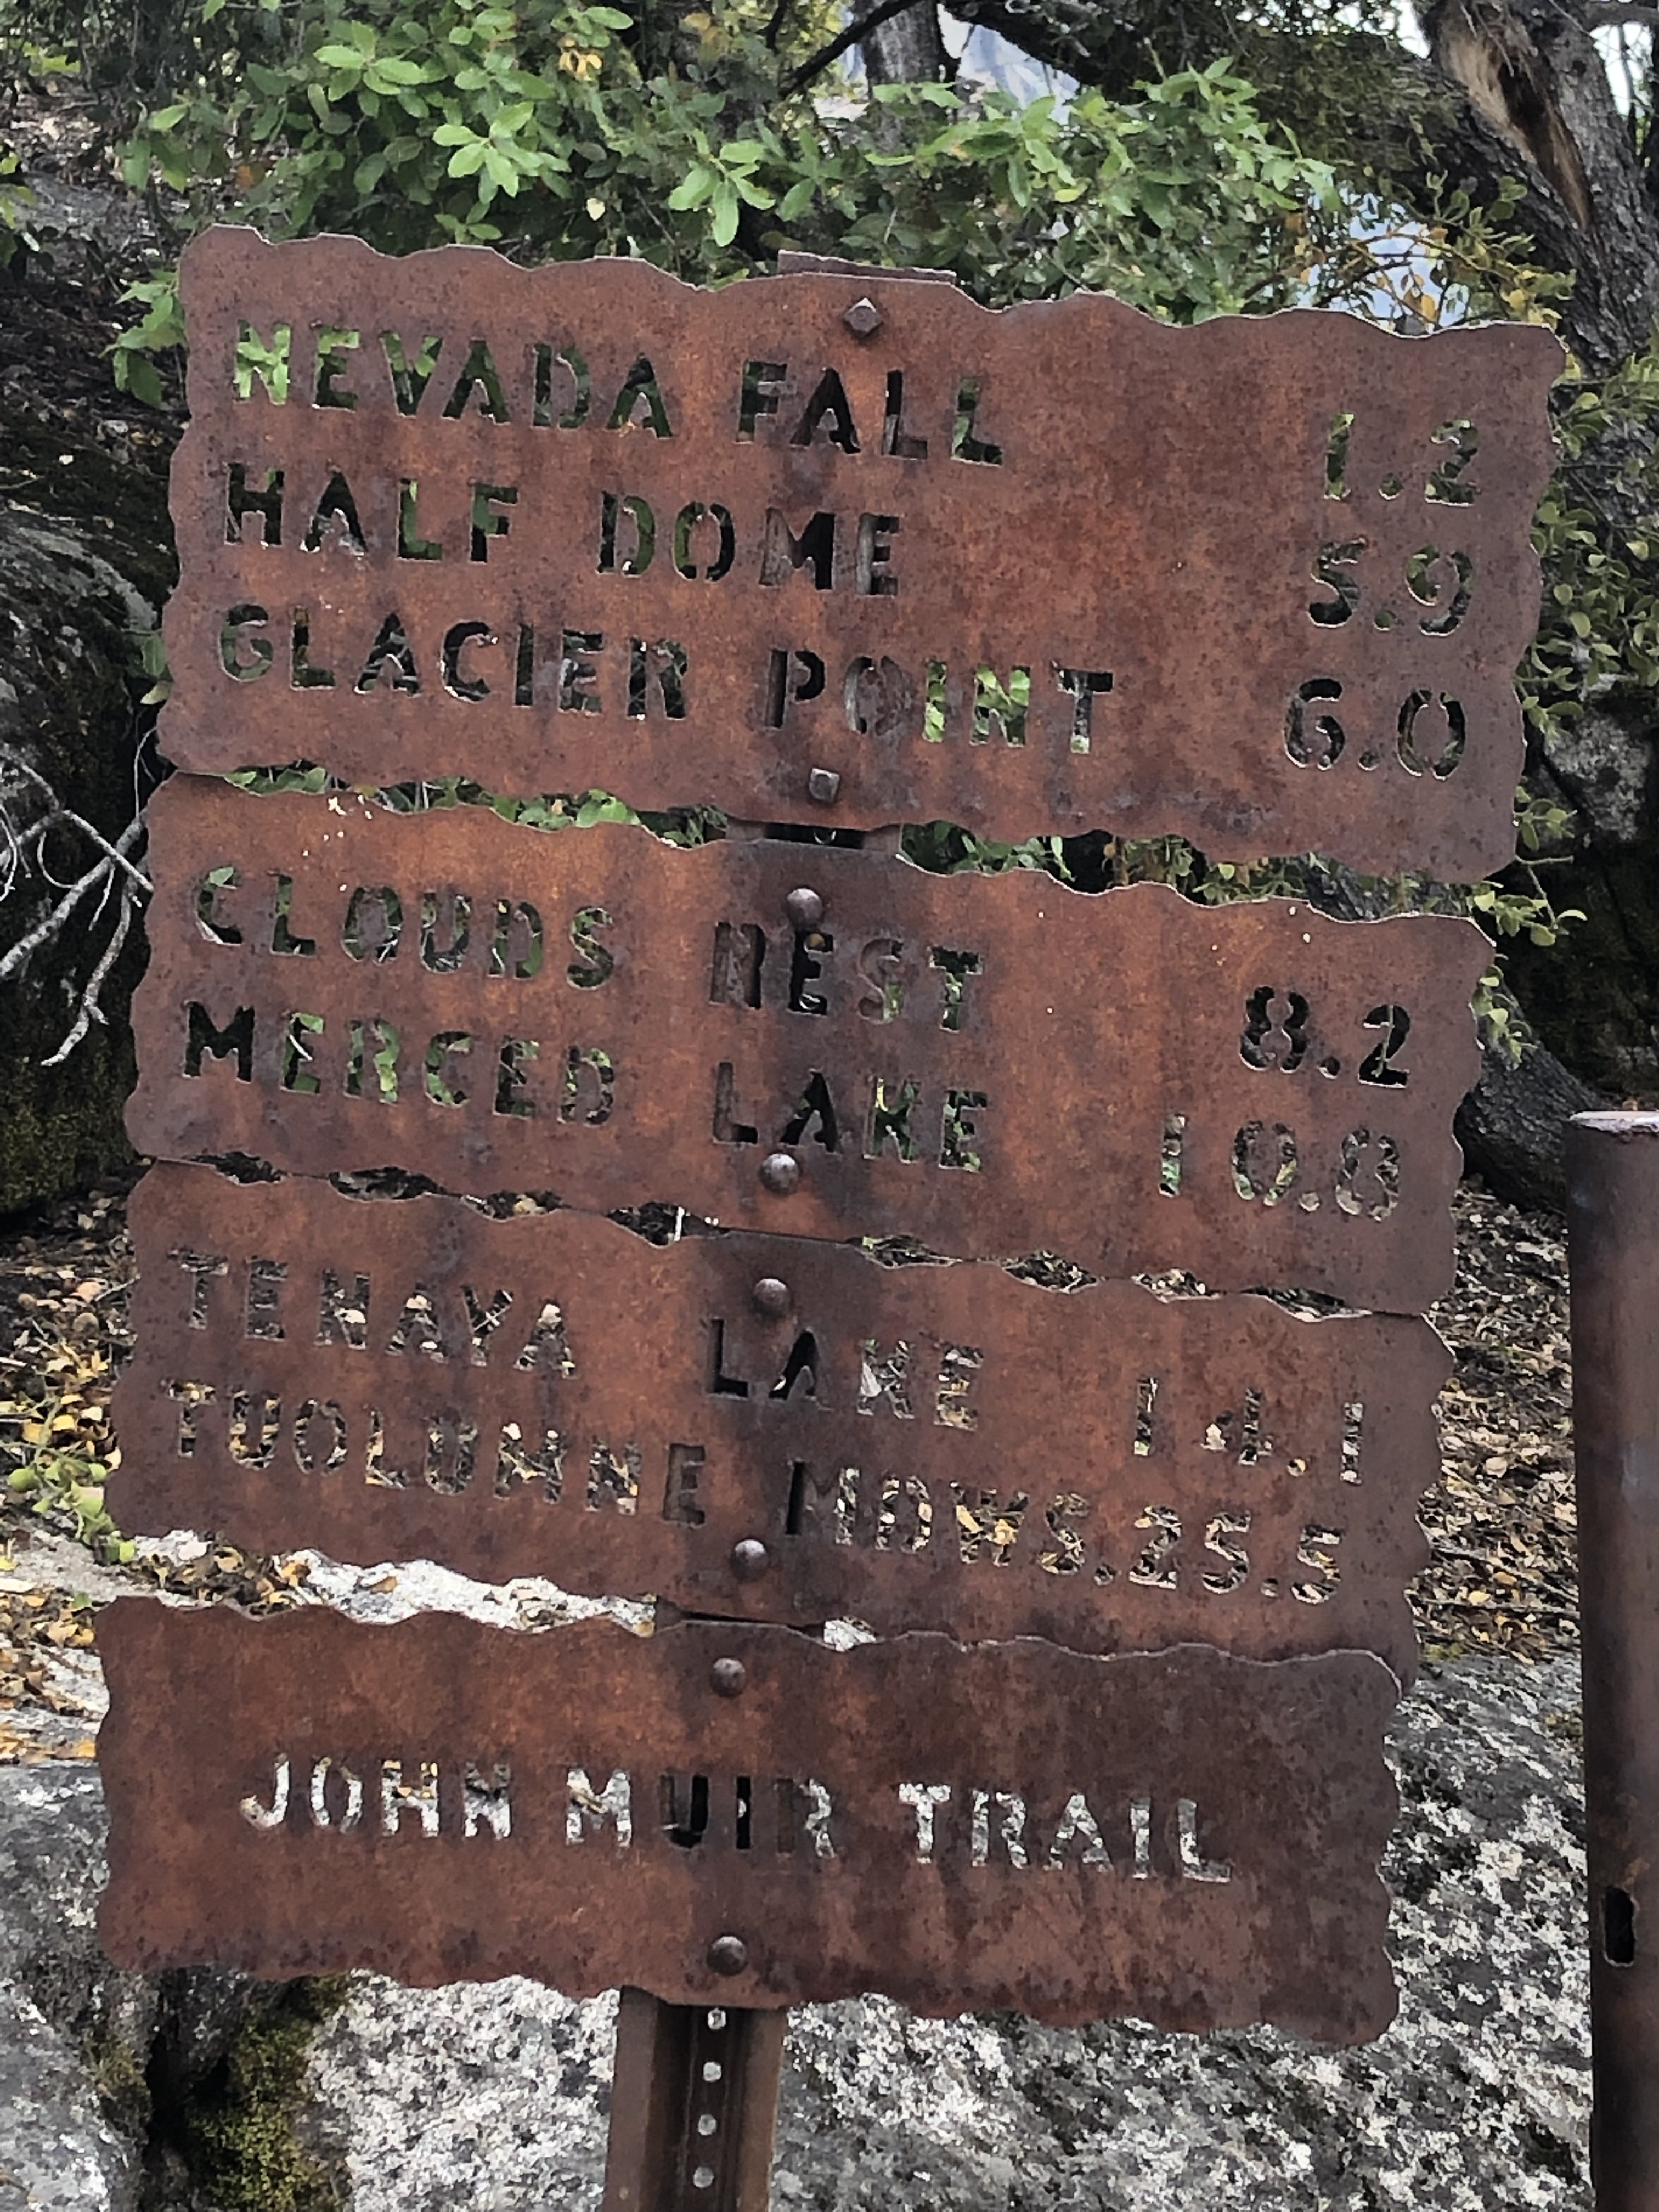
Now, let’s move on to details of the hike itself. If you arrive early enough, you should be able to park at either the Upper or Lower Pines campgrounds, or the large parking lot at Curry Village. However, if you have to just take whatever space happened to be available, you’ll need to walk to the nearest valley shuttle stop. From there, take the shuttle to Stop 16, which is Happy Isles. Do be aware that the line can be up to an hour to catch the shuttle going either to or from where you parked, so walking even a couple miles from your parking space might be your best option as well. Anyhow, the real fun begins when you get to the trailhead. If you read the sign carefully, you’ll see that it also acts as the trailhead of the John Muir trail, which extends all the way south to Mt. Whitney in Sequoia Nat’l Park! It’s also the trailhead for Half Dome and Glacier Point, and you’d have to be an extremely ambitious hiker to go any further on a day trip.
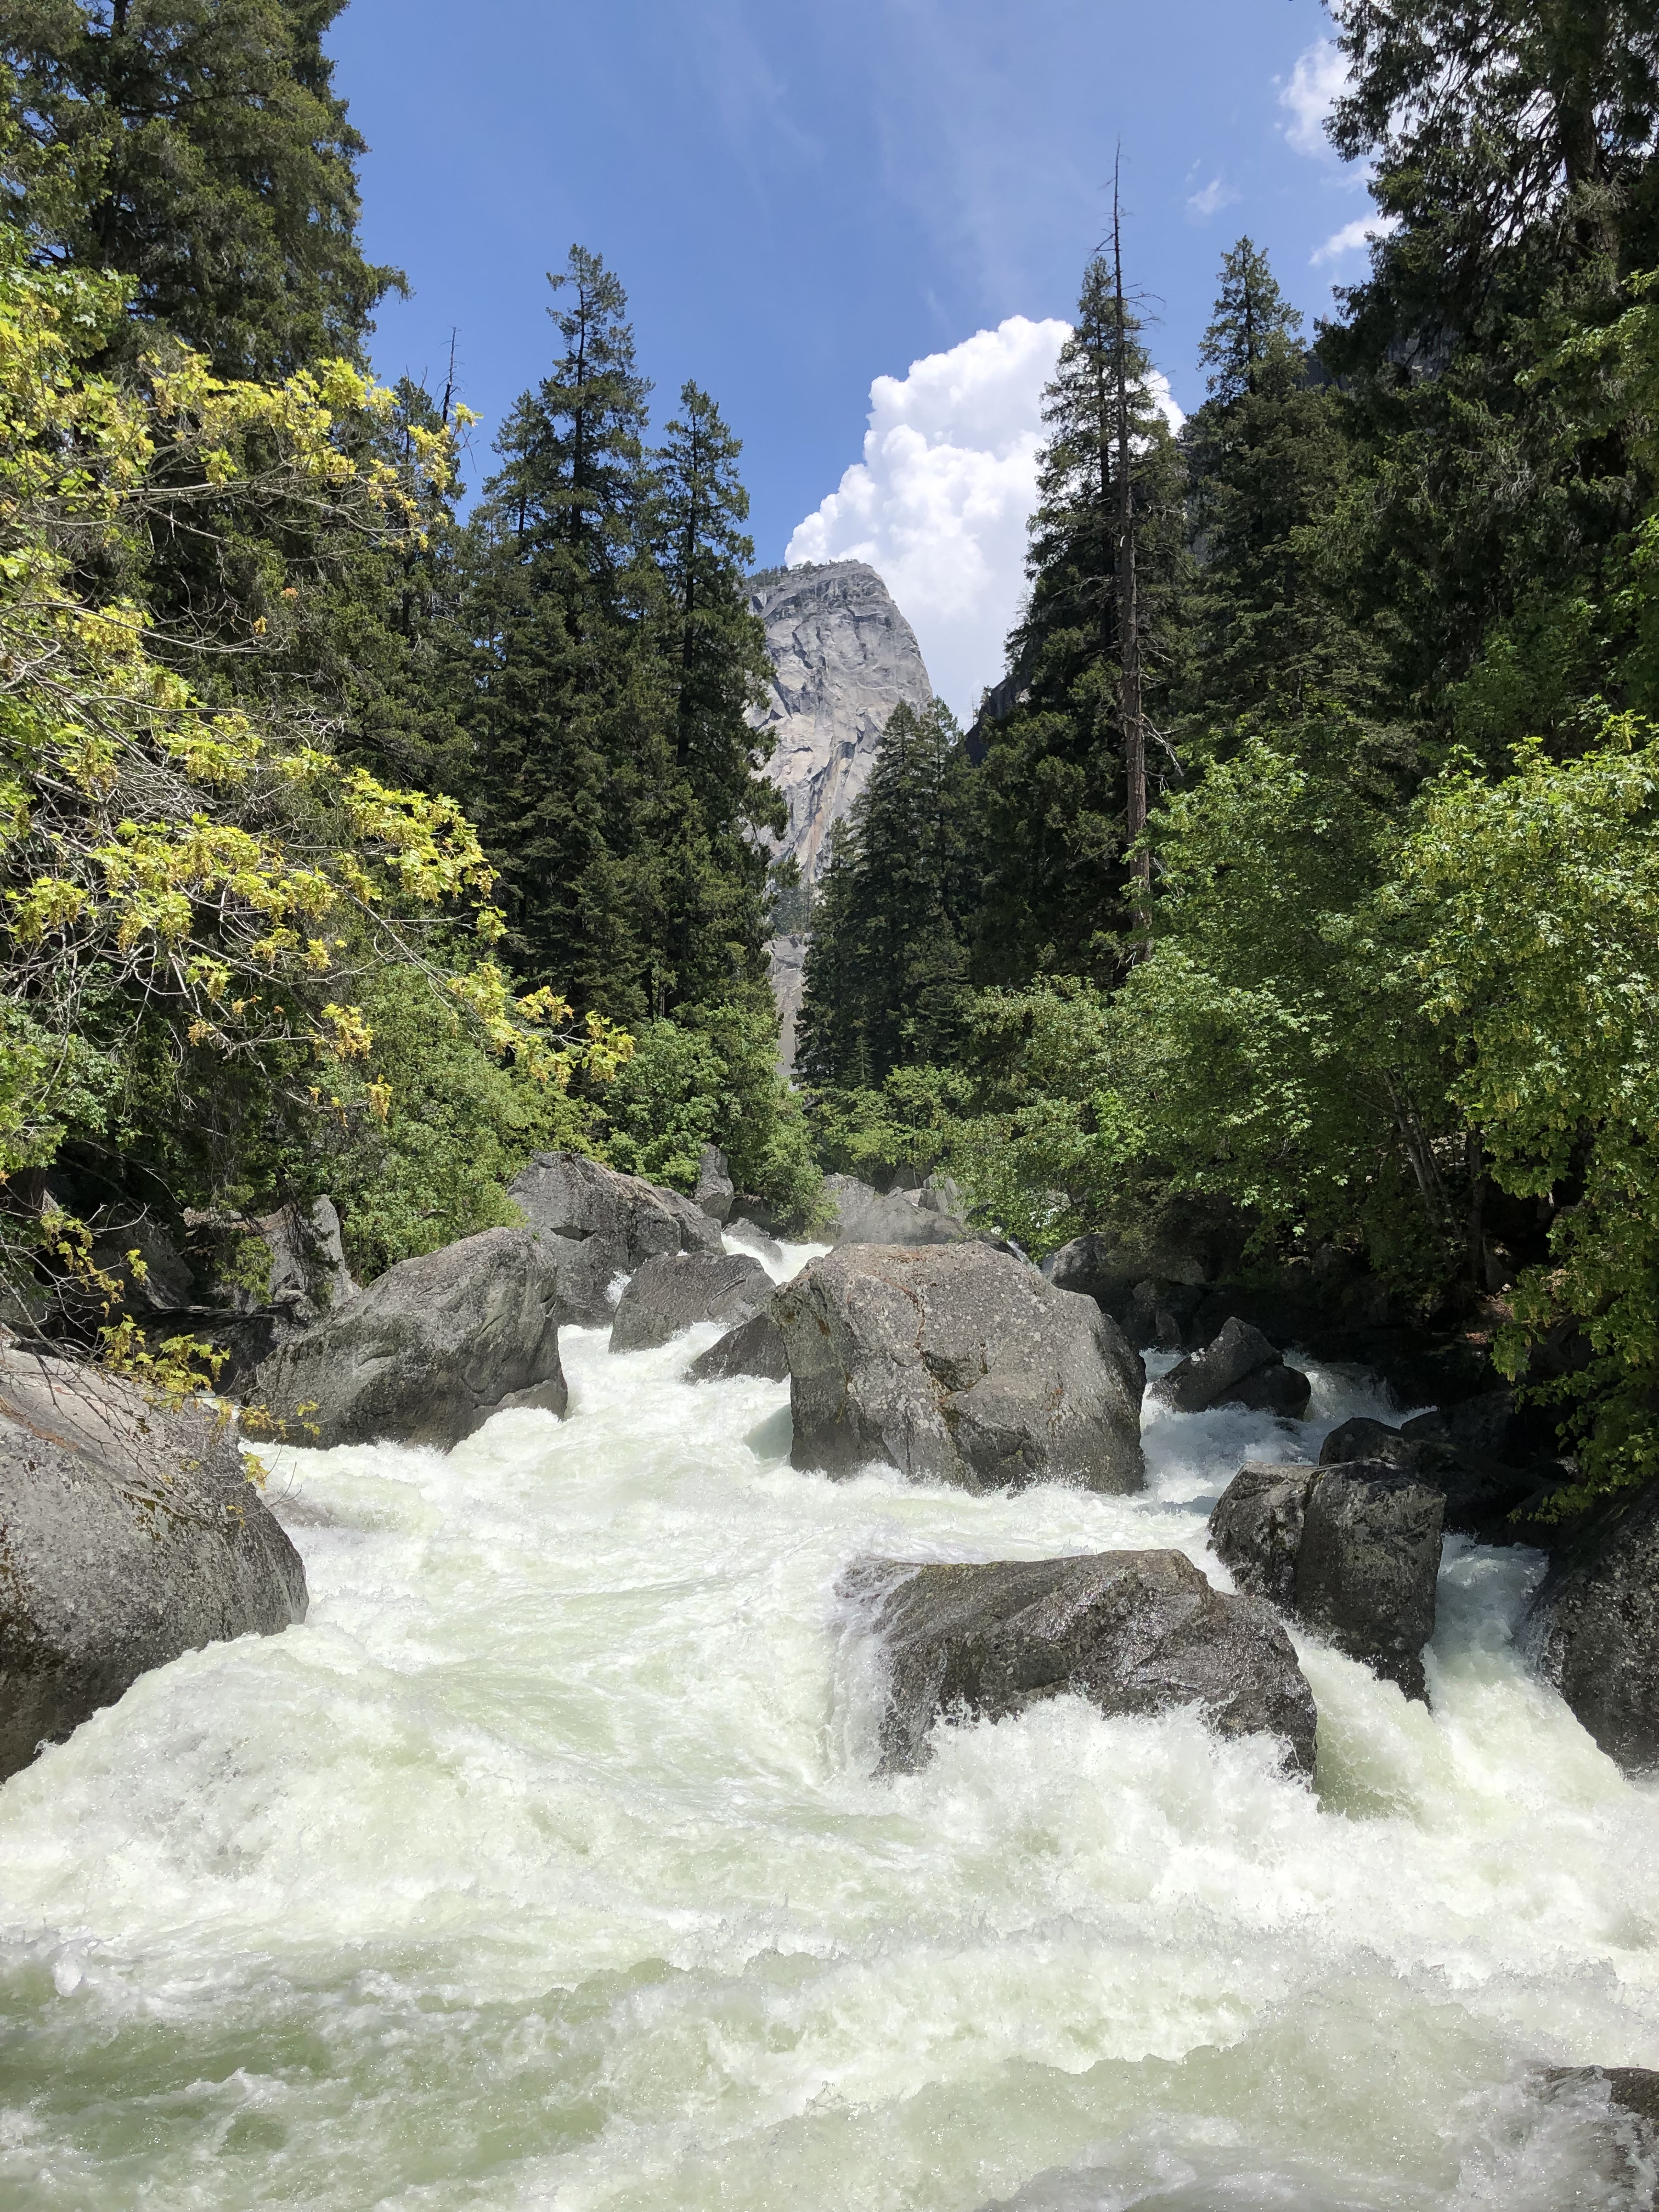
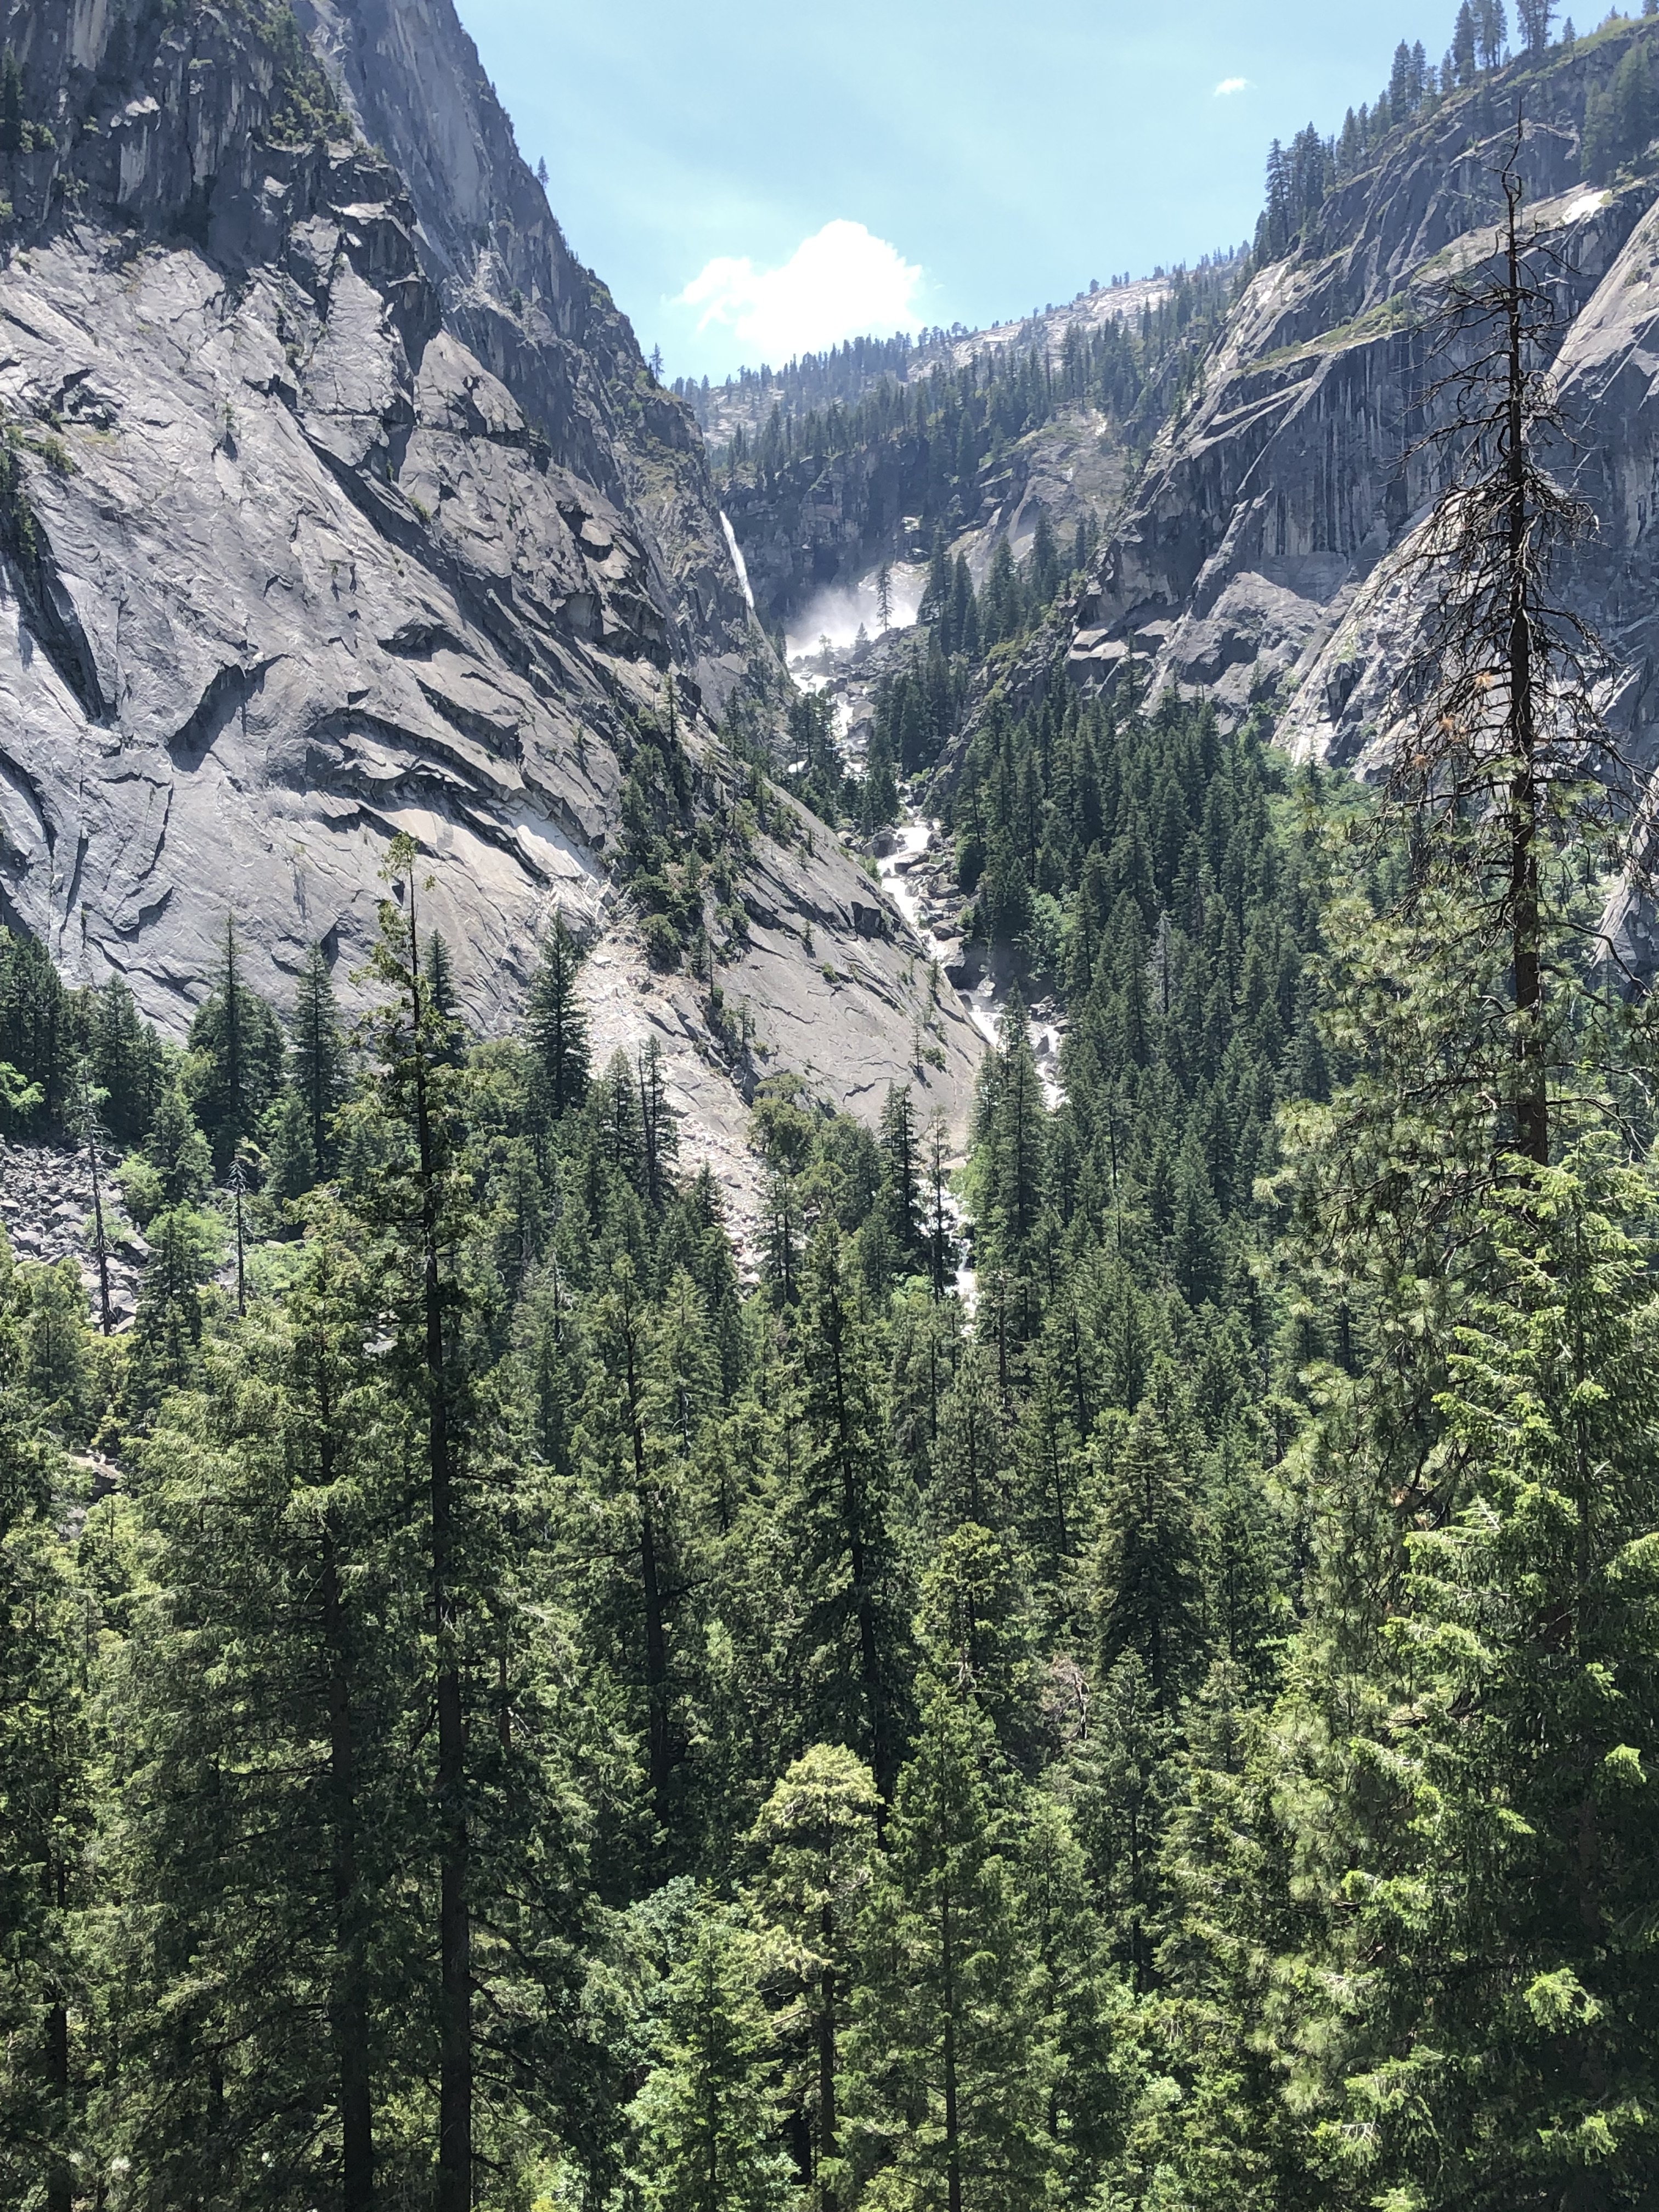
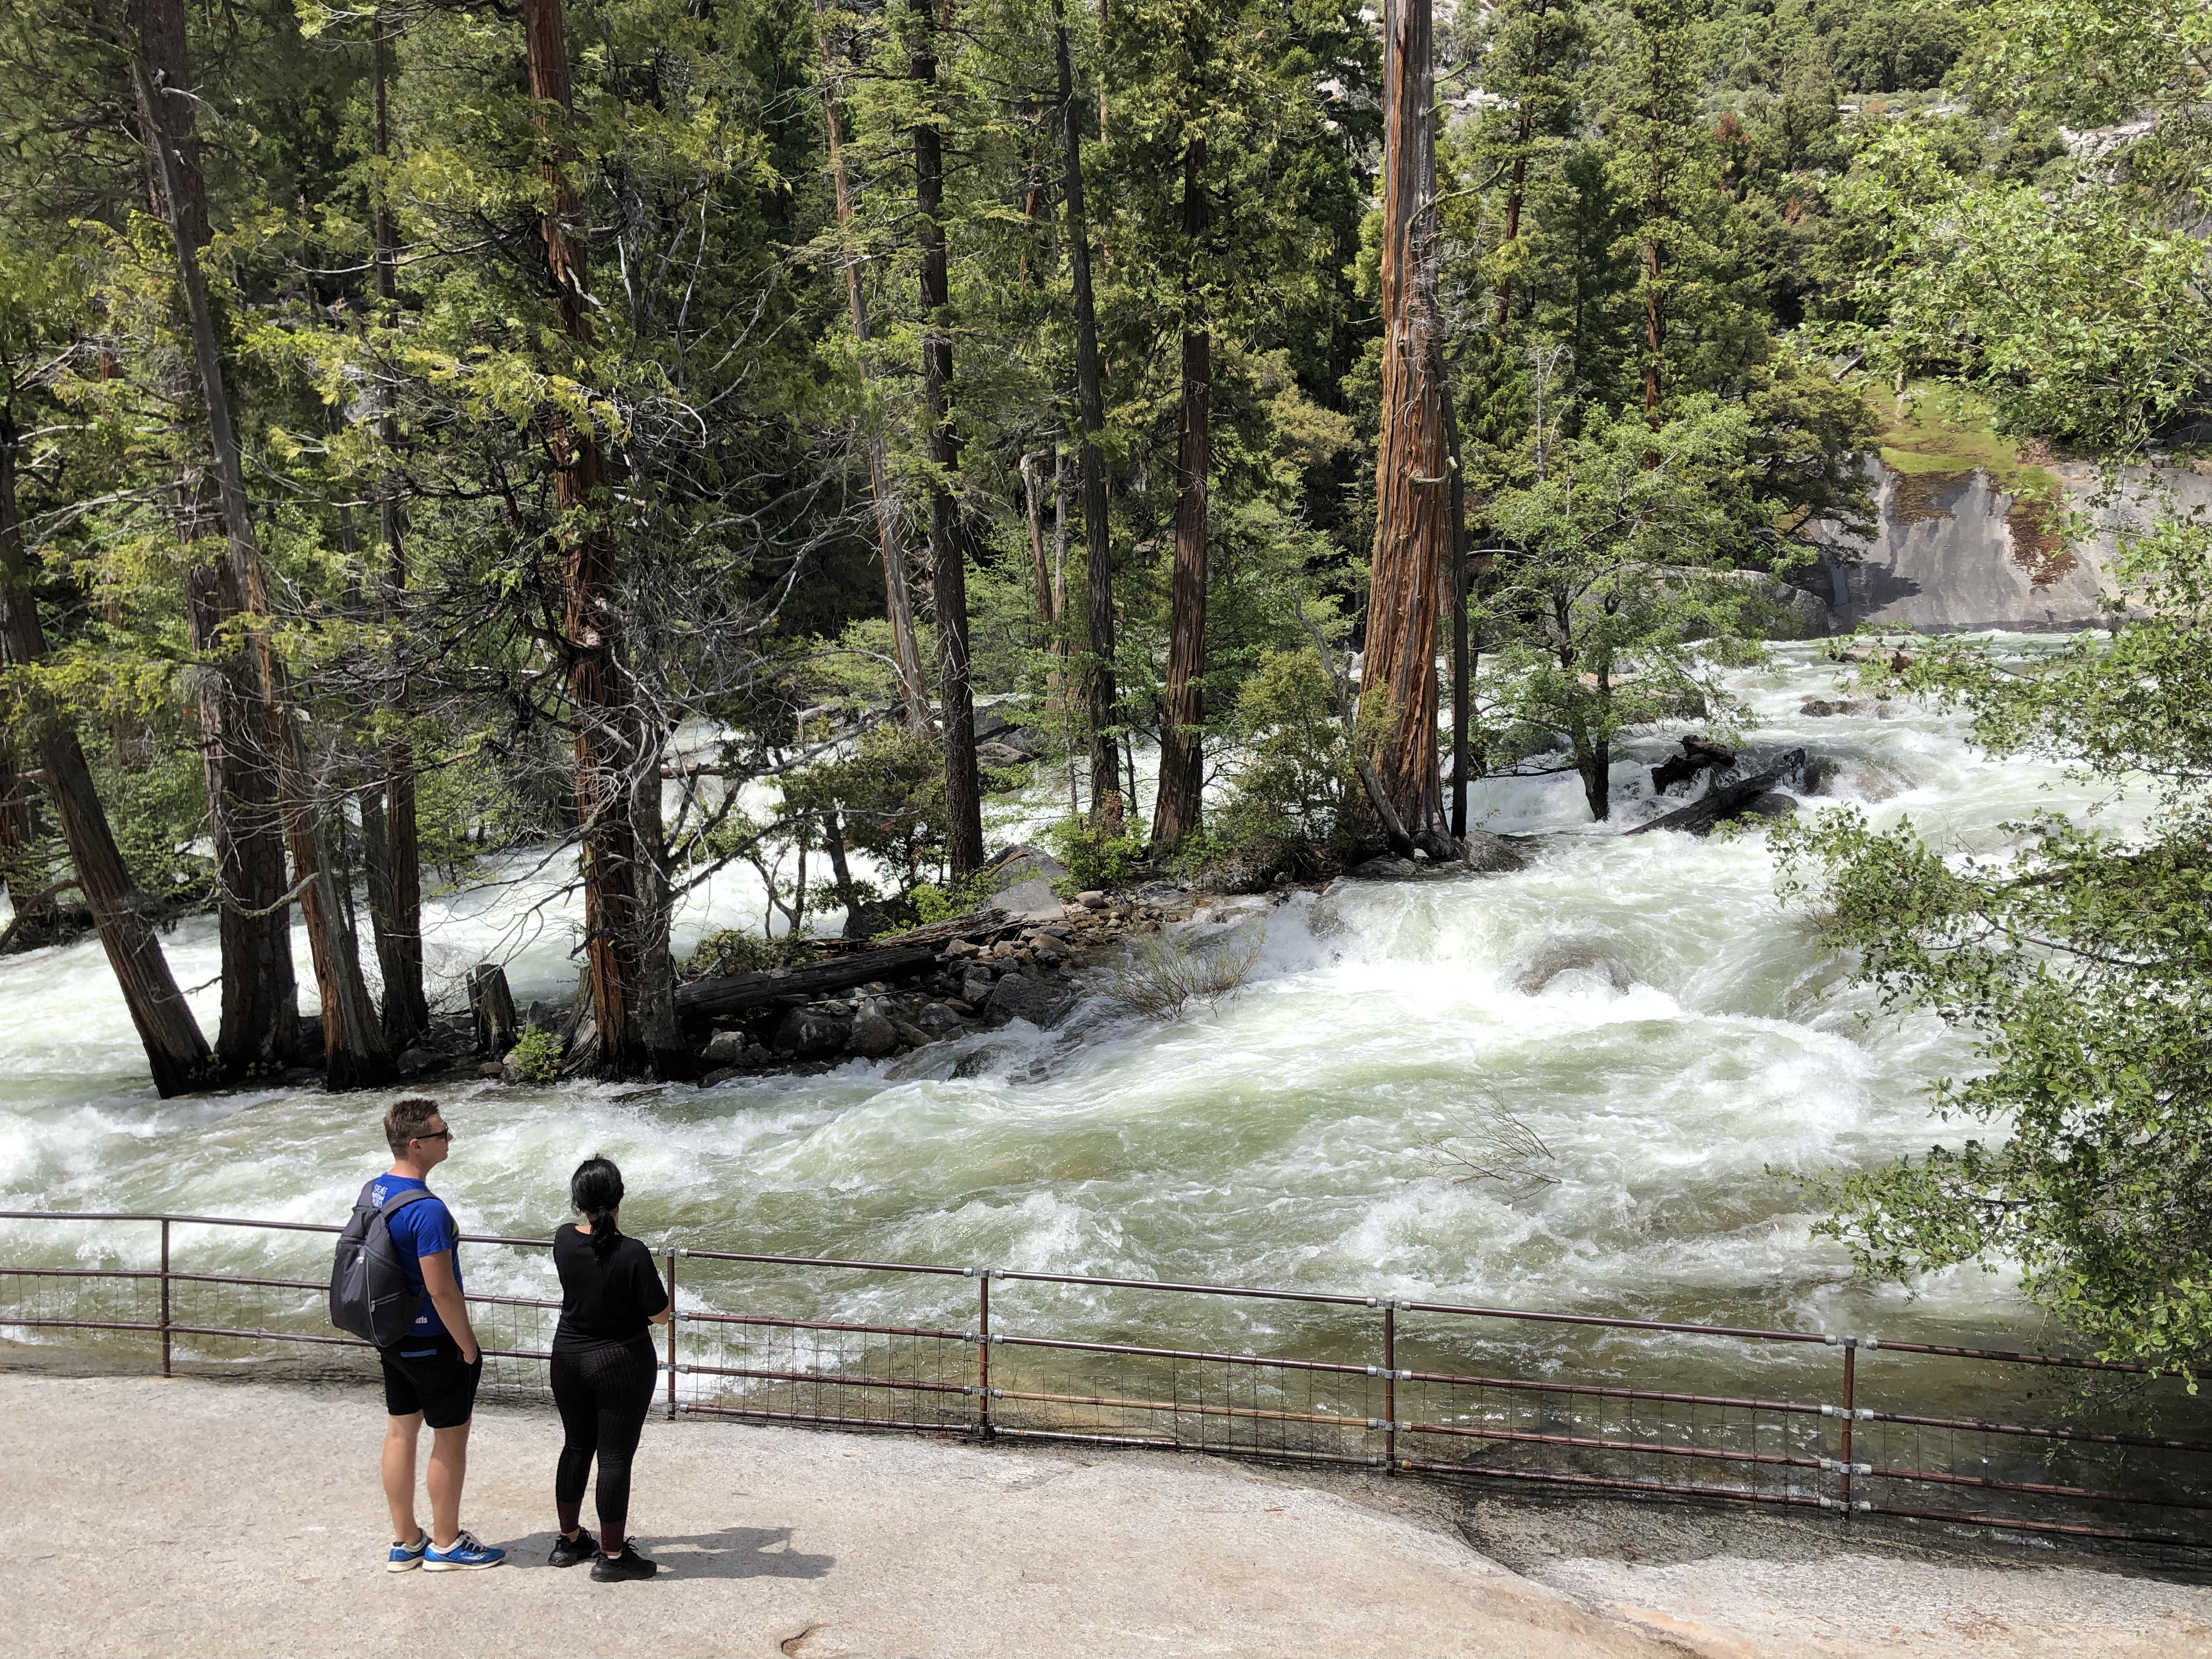
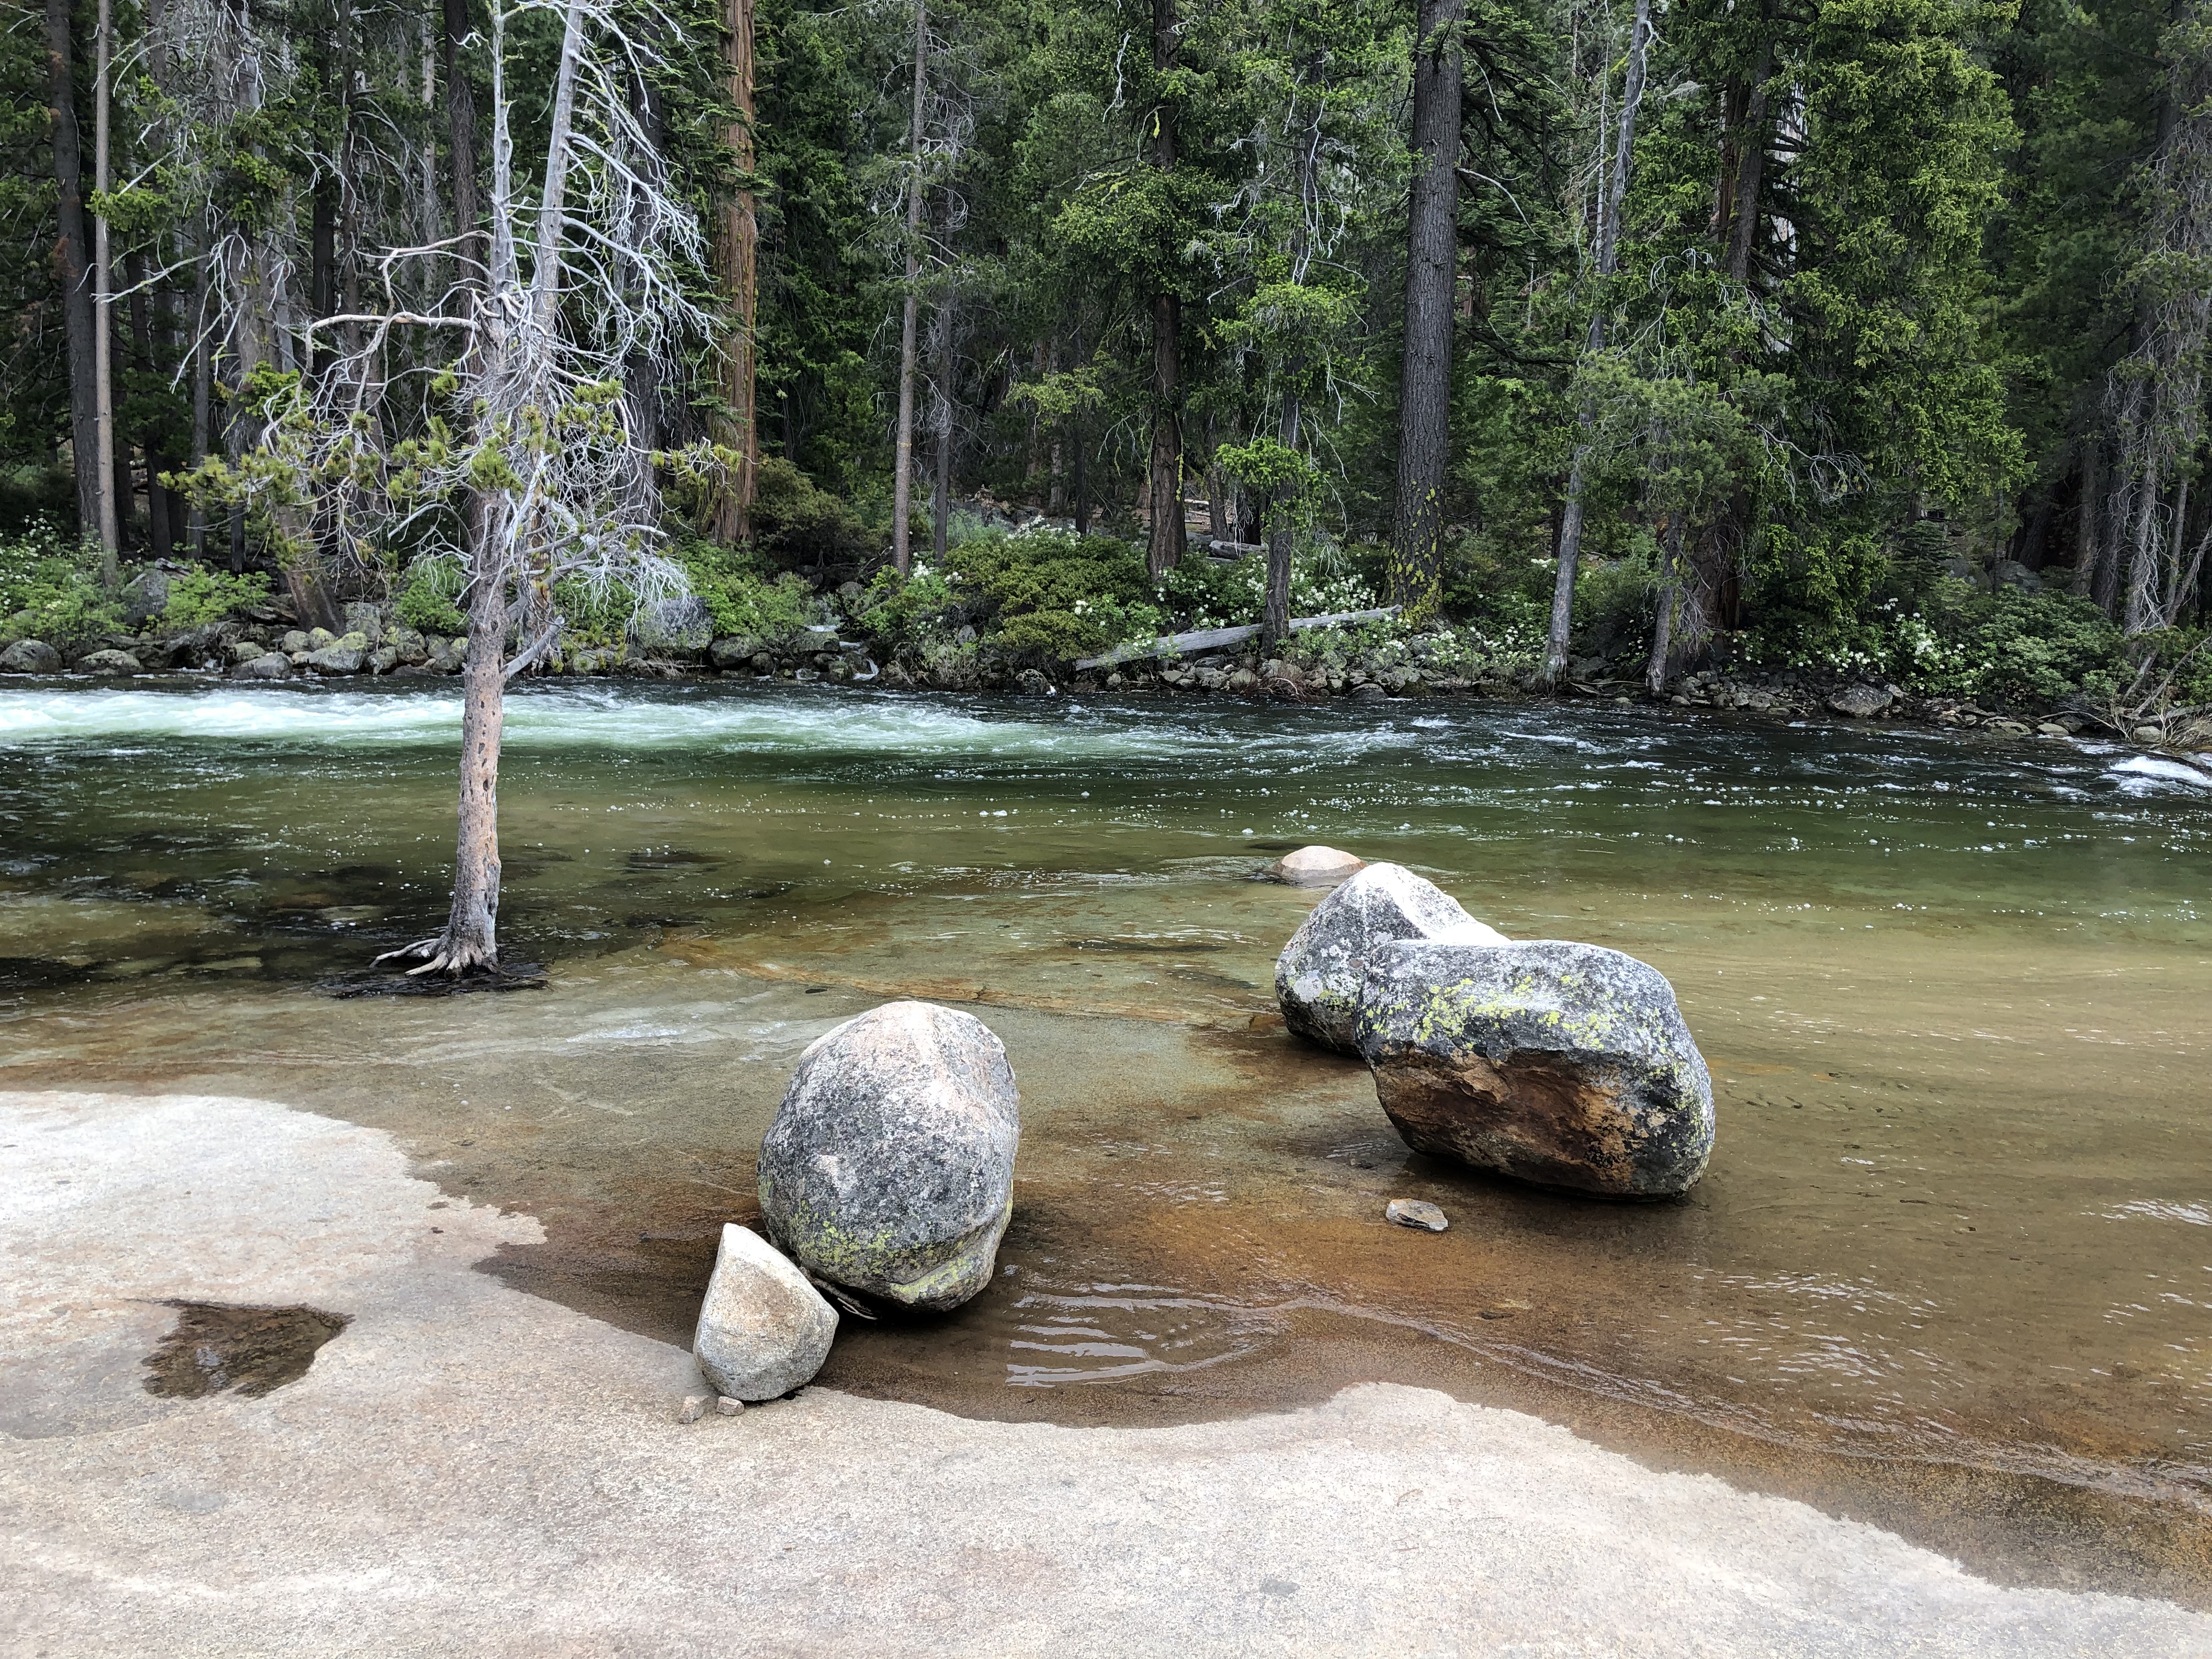
The mist trail itself starts off as a pretty steep paved trail. Right at the beginning, you can also venture around the Happy Isles in the middle of the Merced River if you want. Otherwise, you’ll continue until you cross the Vernal Falls bridge. You can see the river roar over boulders here, as the grade is pretty steep. With a good eye, you can even spot a sliver of the falls upriver. You should also be able to see a cloud of mist spiraling off the falls, which looks pretty small from a distance. However, you’ll feel differently once you see it up close!
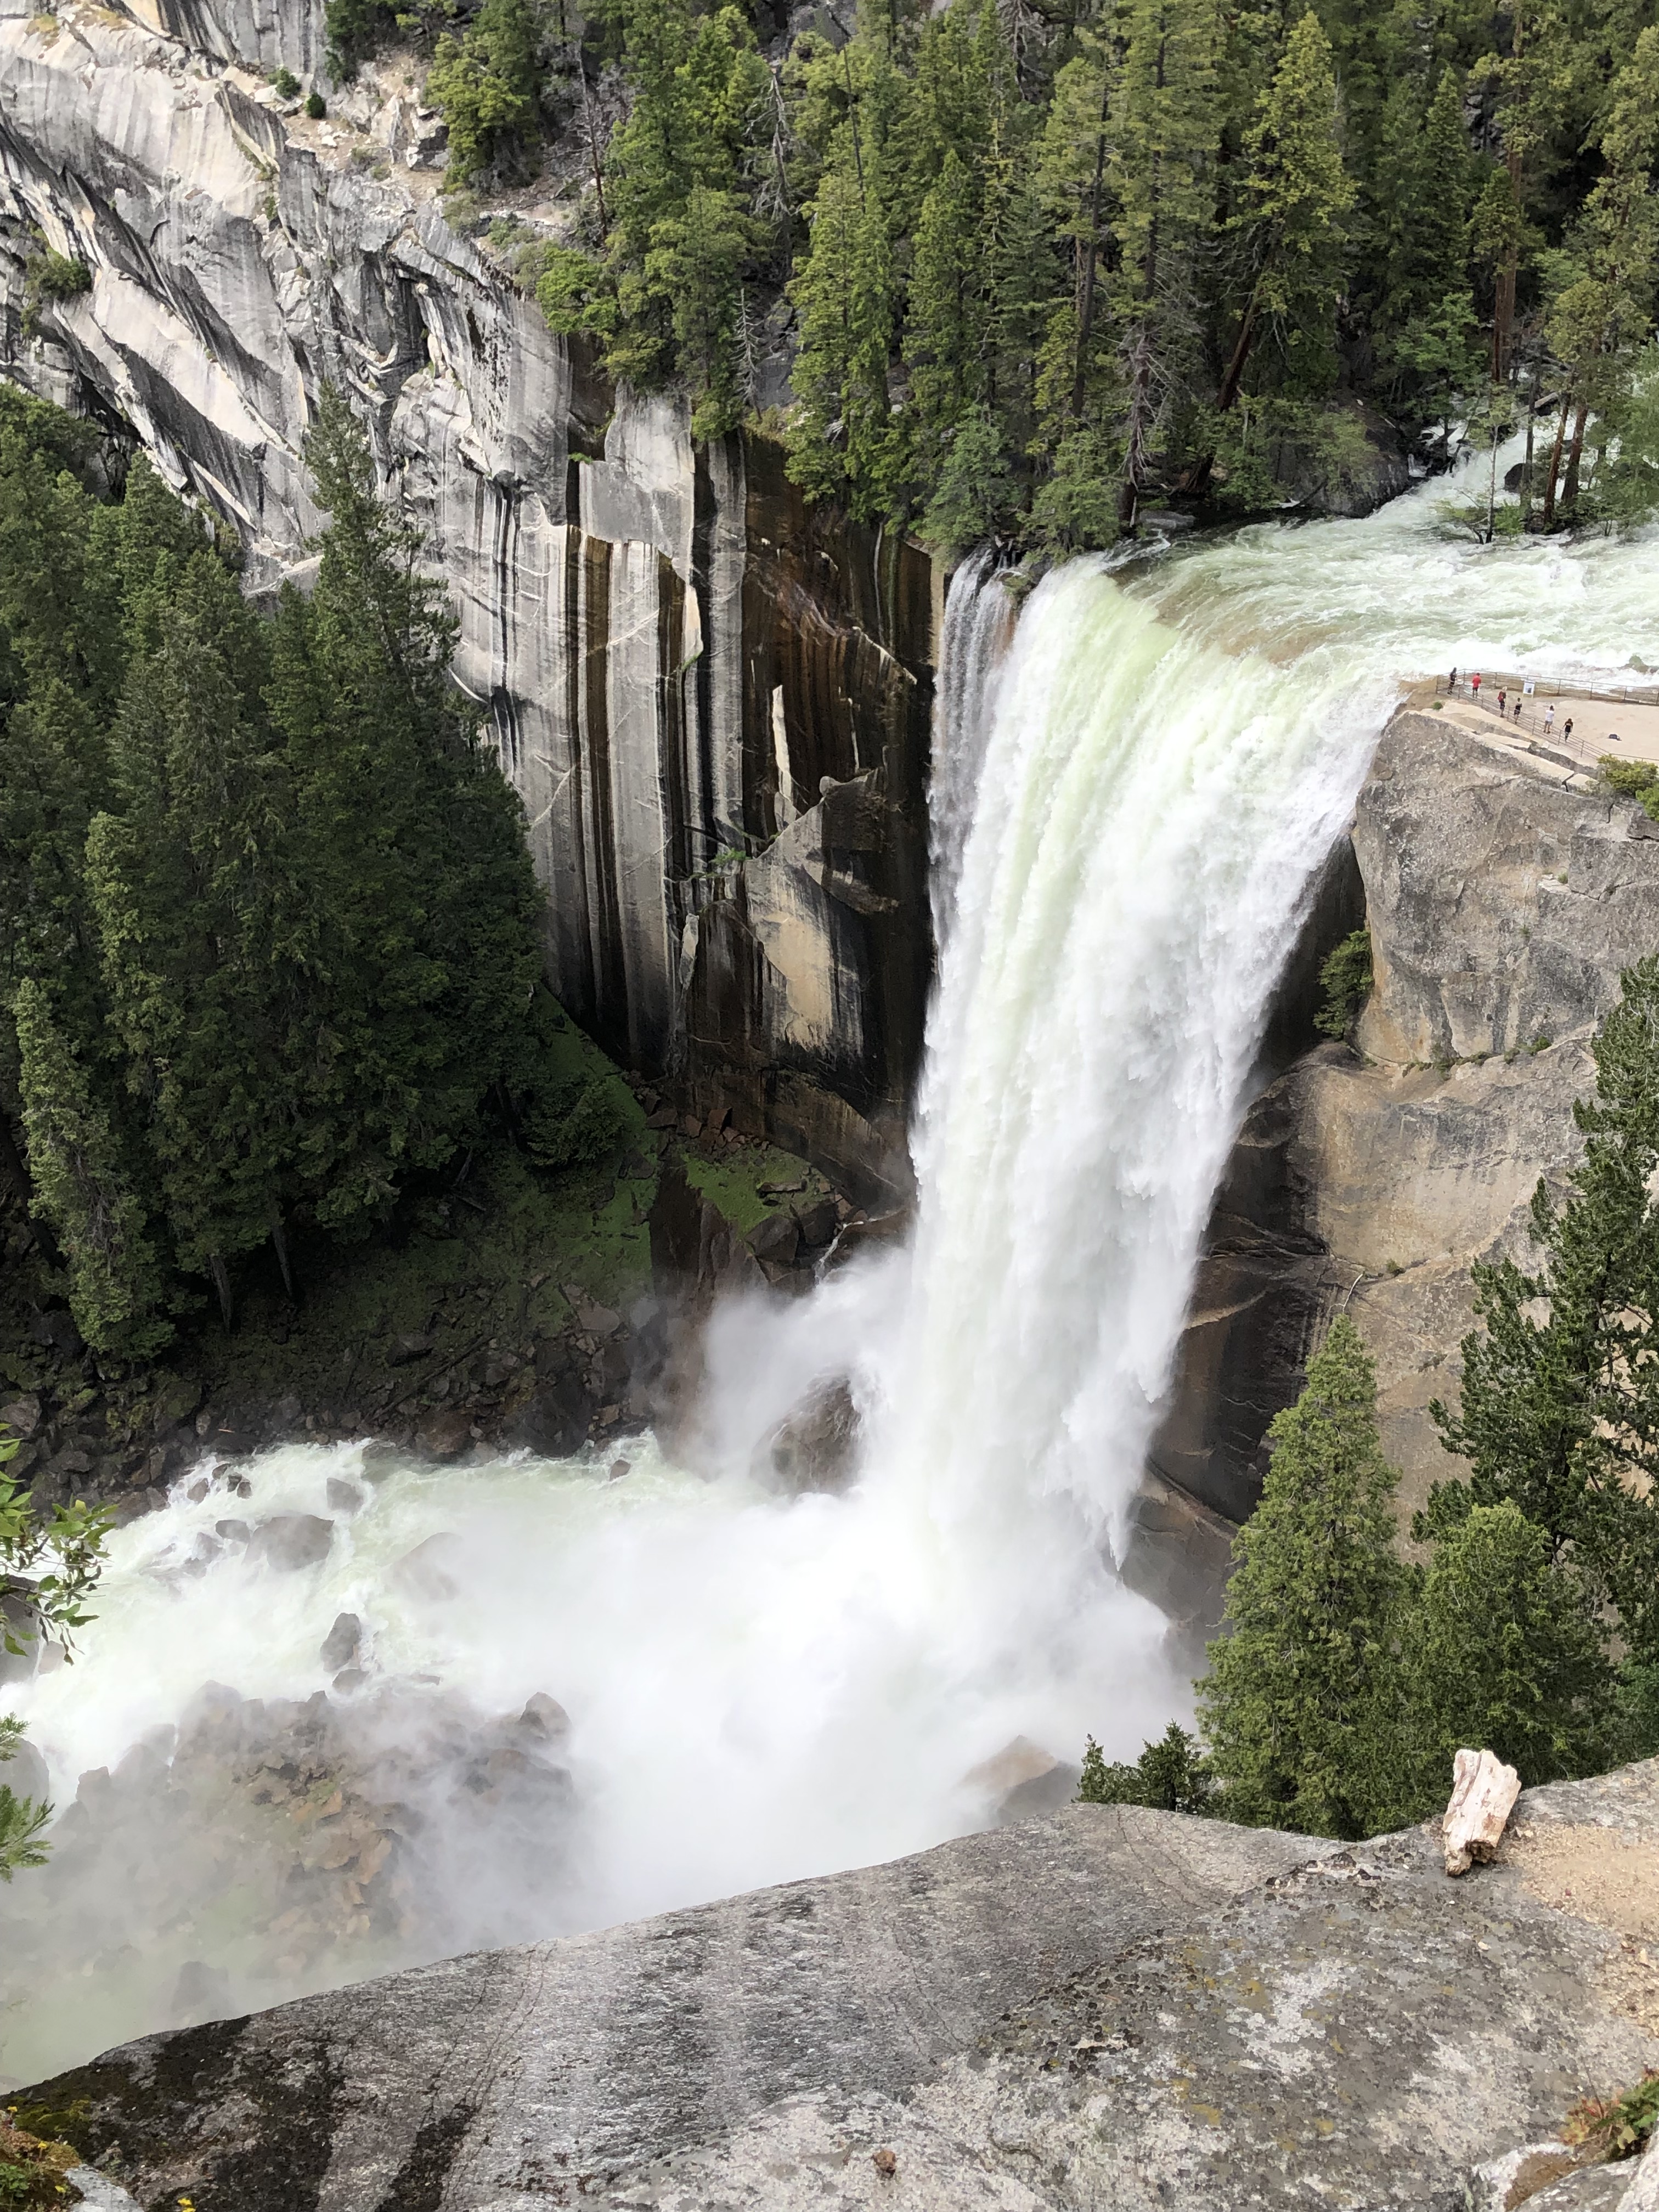
Venture a little further and you’ll split from the John Muir trail. Before entering the next stretch, make sure to pack away anything that could suffer from water damage. If you’re worried about getting wet, bring some waterproof gear as well. The misty section starts pretty suddenly, and the trail beneath you will get slippery in addition to mist bombarding your eyes. It may be uncomfortable, but you definitely don’t want to rush through this section. There’s usually a backup here on busy days, so you’ll be proceeding at the same pace as the “conga line” of hikers. Watch your footing, do your best not to step right in puddles, and definitely don’t get too close to the edge! One saving grace of this section is that it’s enforced as one way only, meaning that you won’t have to worry about anyone going down needing to pass you. Once you’re out of the mist, don’t stop right away. The remaining section to the top of the falls is steep without much room for passing, so proceed all the way up before packing away your waterproof gear or fetching your phone from your bag. You’ll be glad you did, the overlook above the falls itself is one of the best in the park, and is a welcome relief to relax at after the arduous climb up!
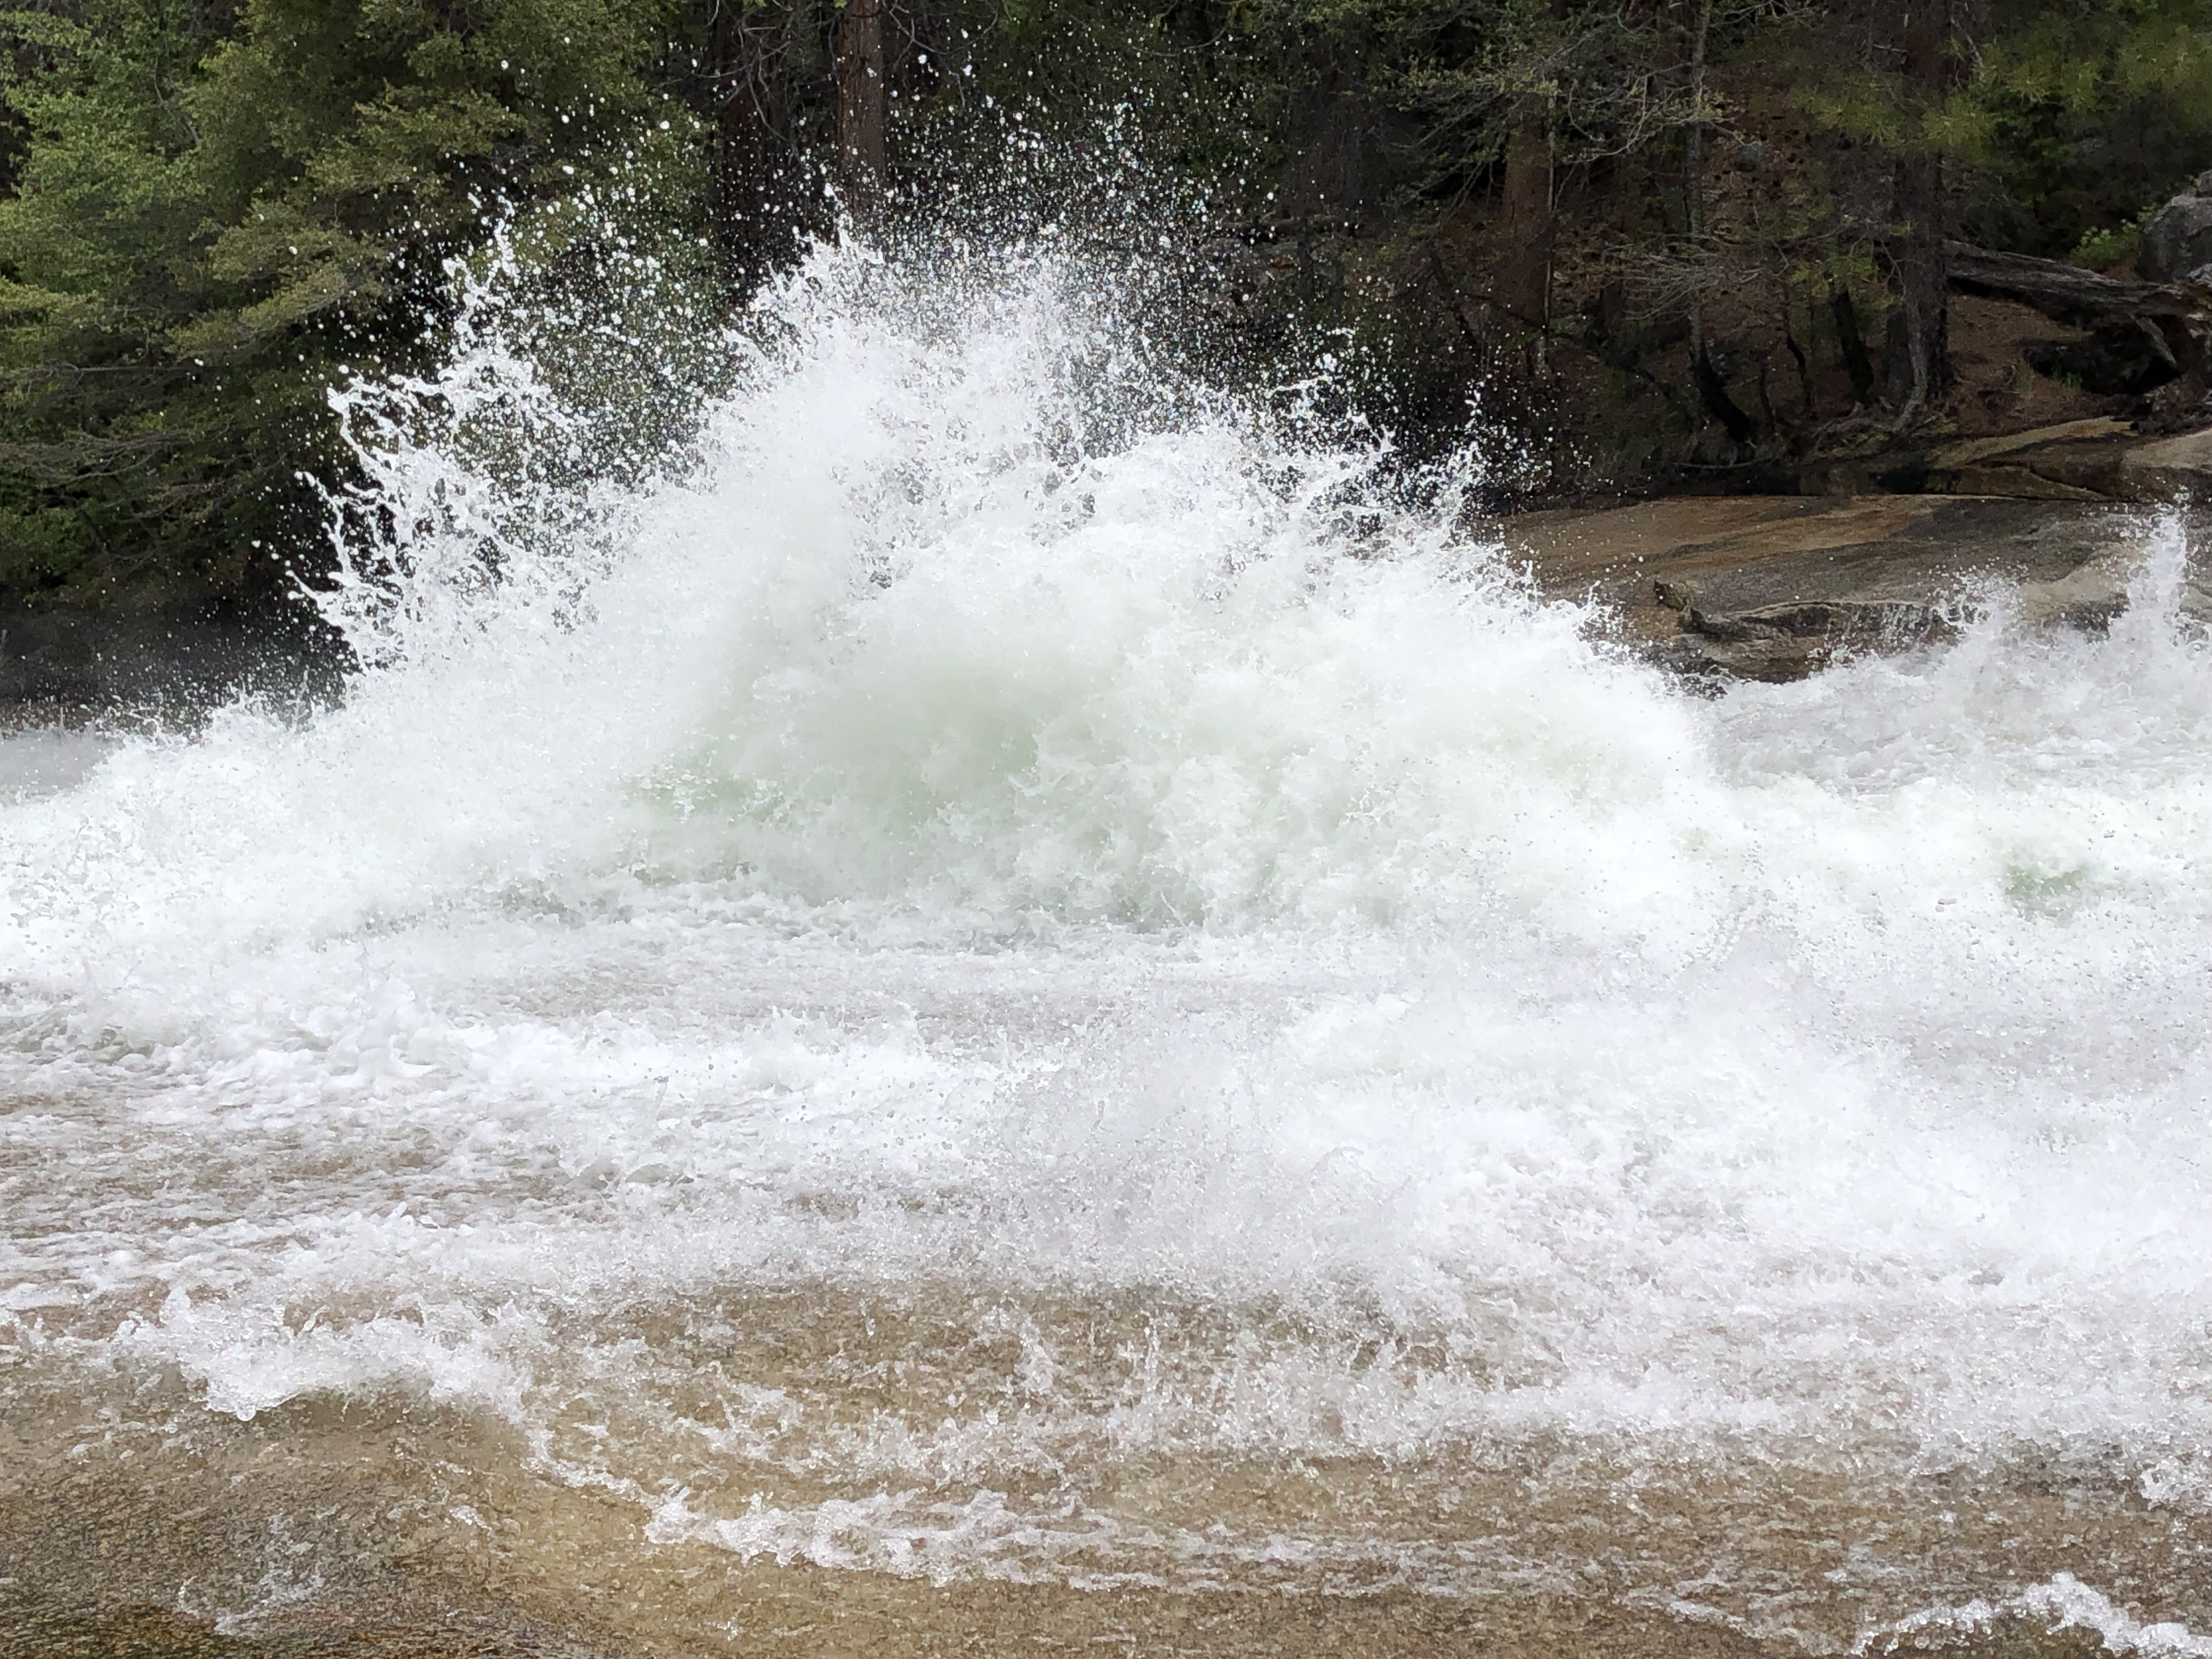
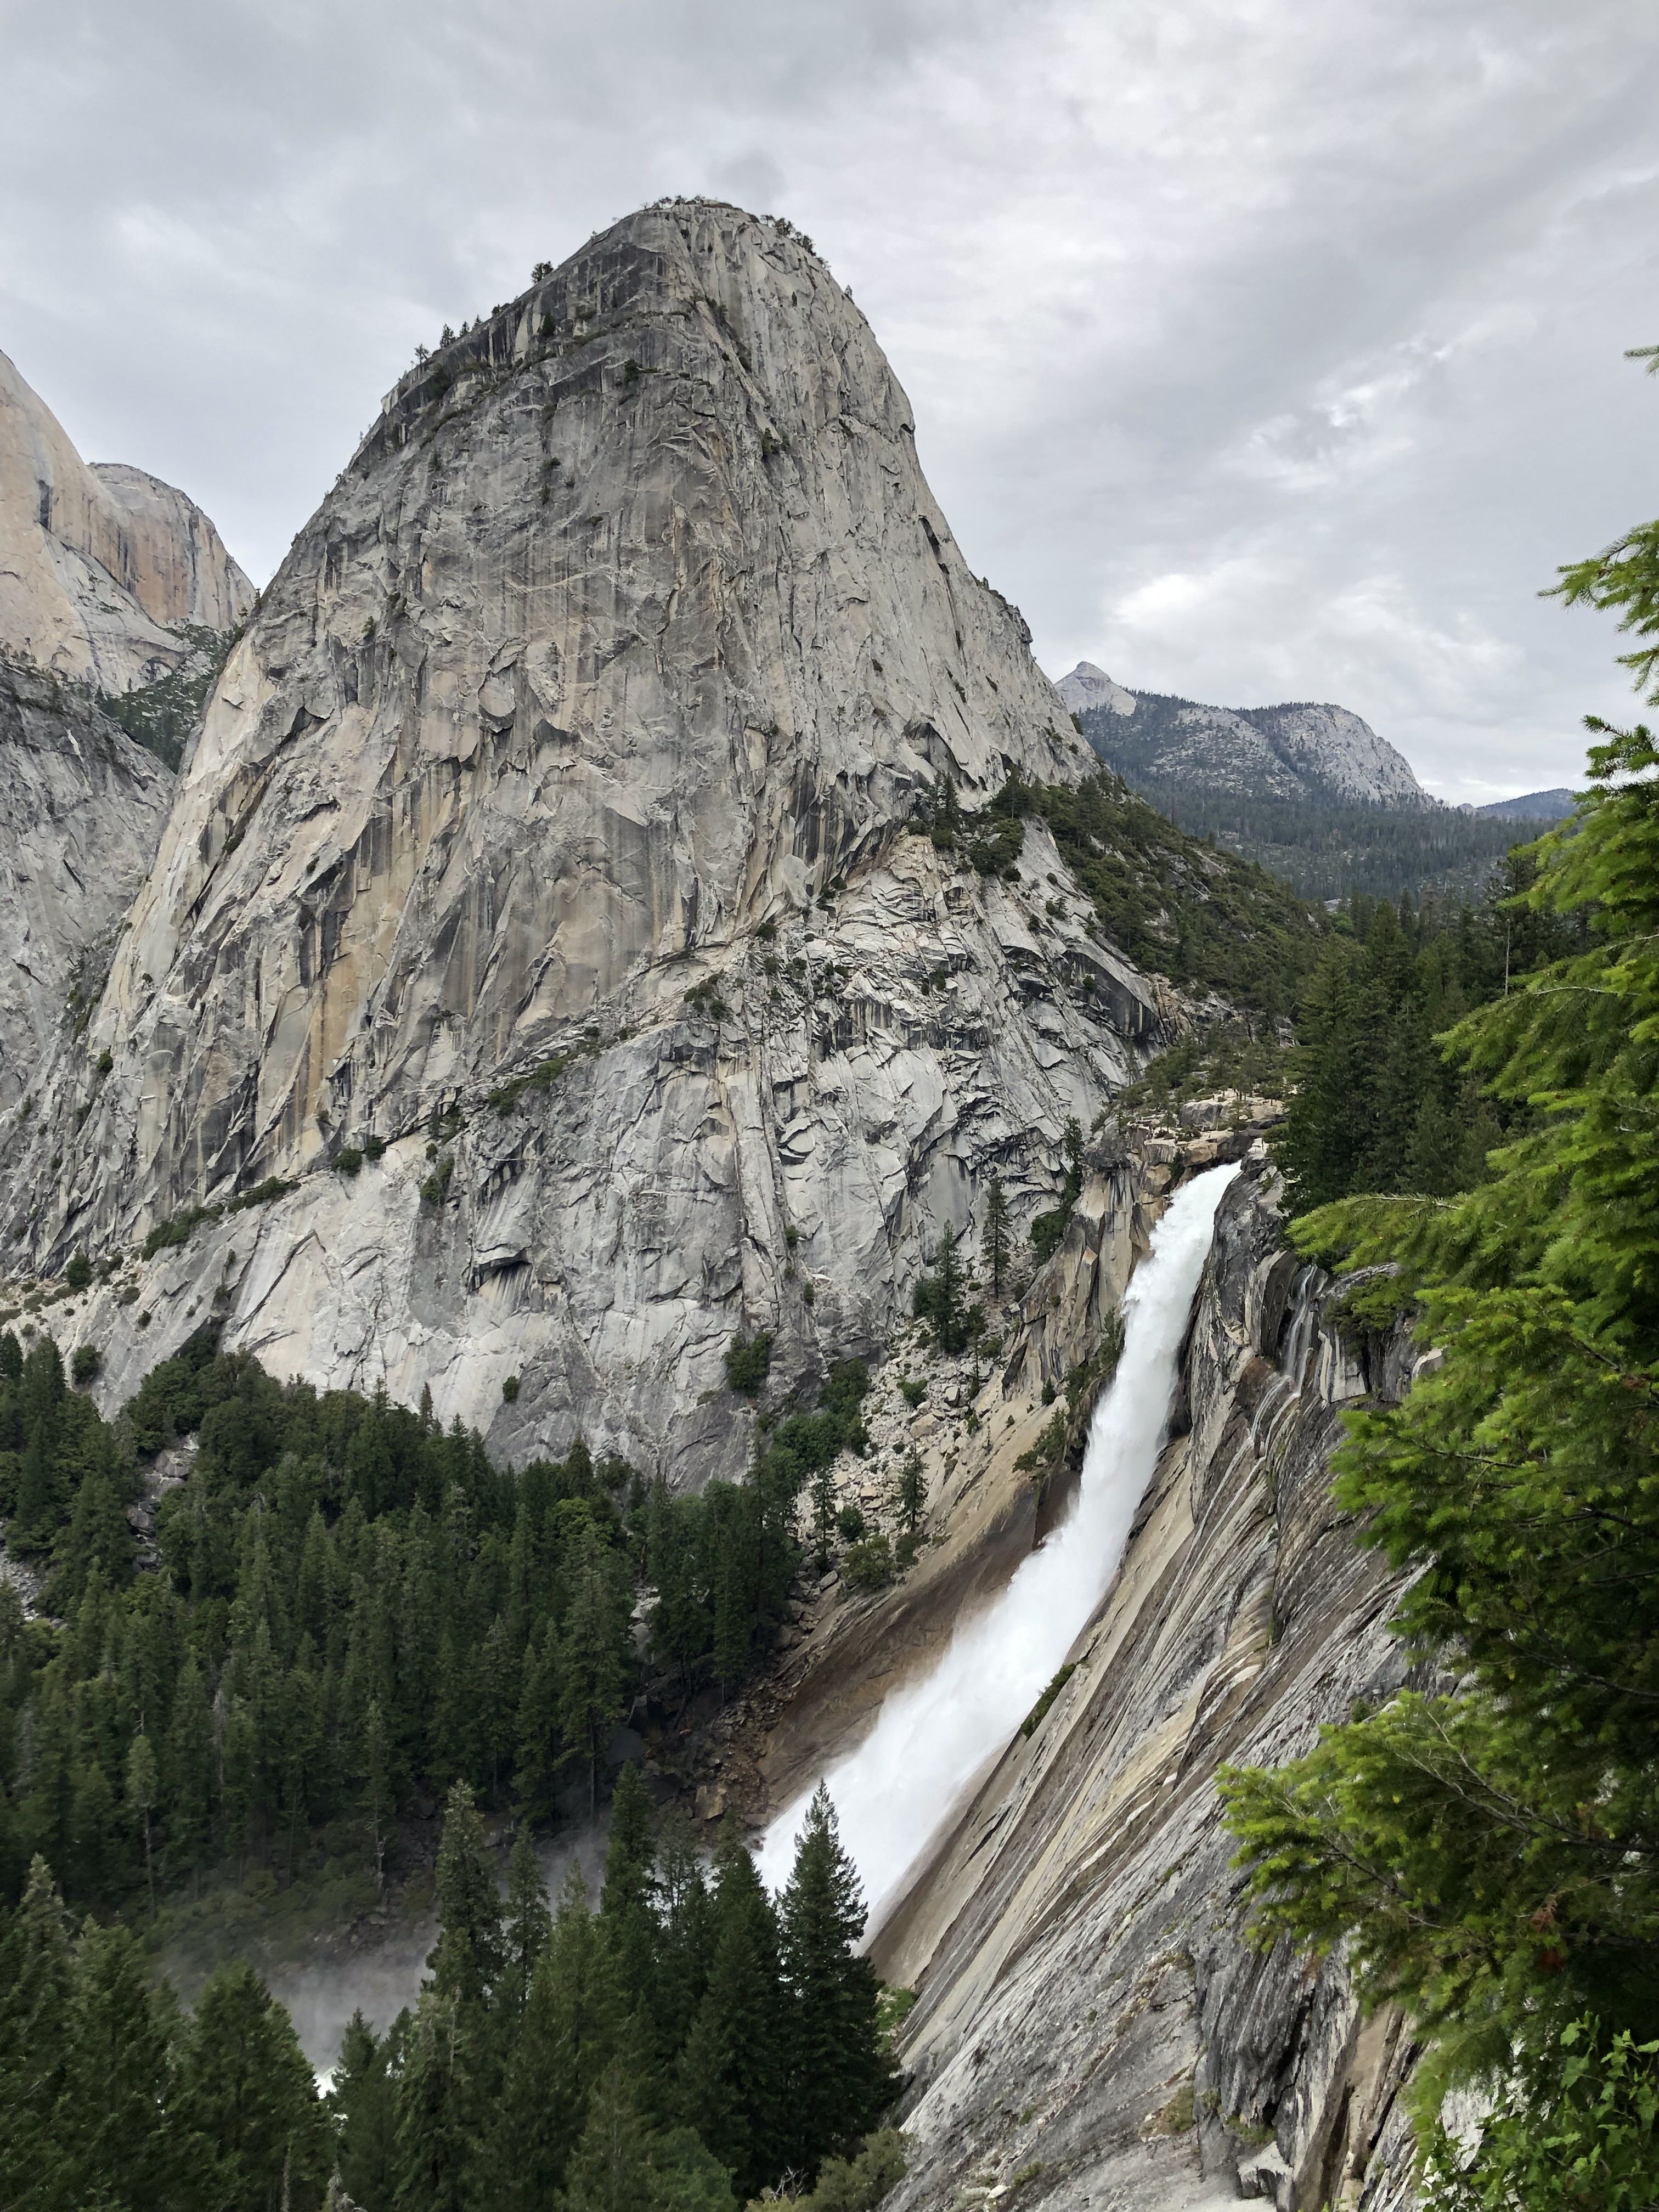
After taking some time to refuel and dry off, you have another decision ahead of you. You can either head up a little further and take the trail back down, or continue onwards to Nevada Falls. Those falls will be visible from the Vernal Falls overlook, and look pretty close. However, they are still quite a trek at 1.5 miles and more importantly, 600 feet of elevation away. My group only had enough time for this extension my second time on the trail, and even then we were pretty surprised at how hard this chunk turned out to be. If you have the time and stamina though, I’d absolutely recommend that you continue up. There are a couple smaller falls along the way, and some stunning theatrics that the river undergoes. There was one section where the rocky riverbed must have been uneven, and jettisoned wave after wave of spray downriver. Just like the waterfalls, this display really emphasizes the sheer power of running water. Also, I find it stunning just how accurately modern cameras, even on phones, manage to capture the intricacy of patterns that spray produces.
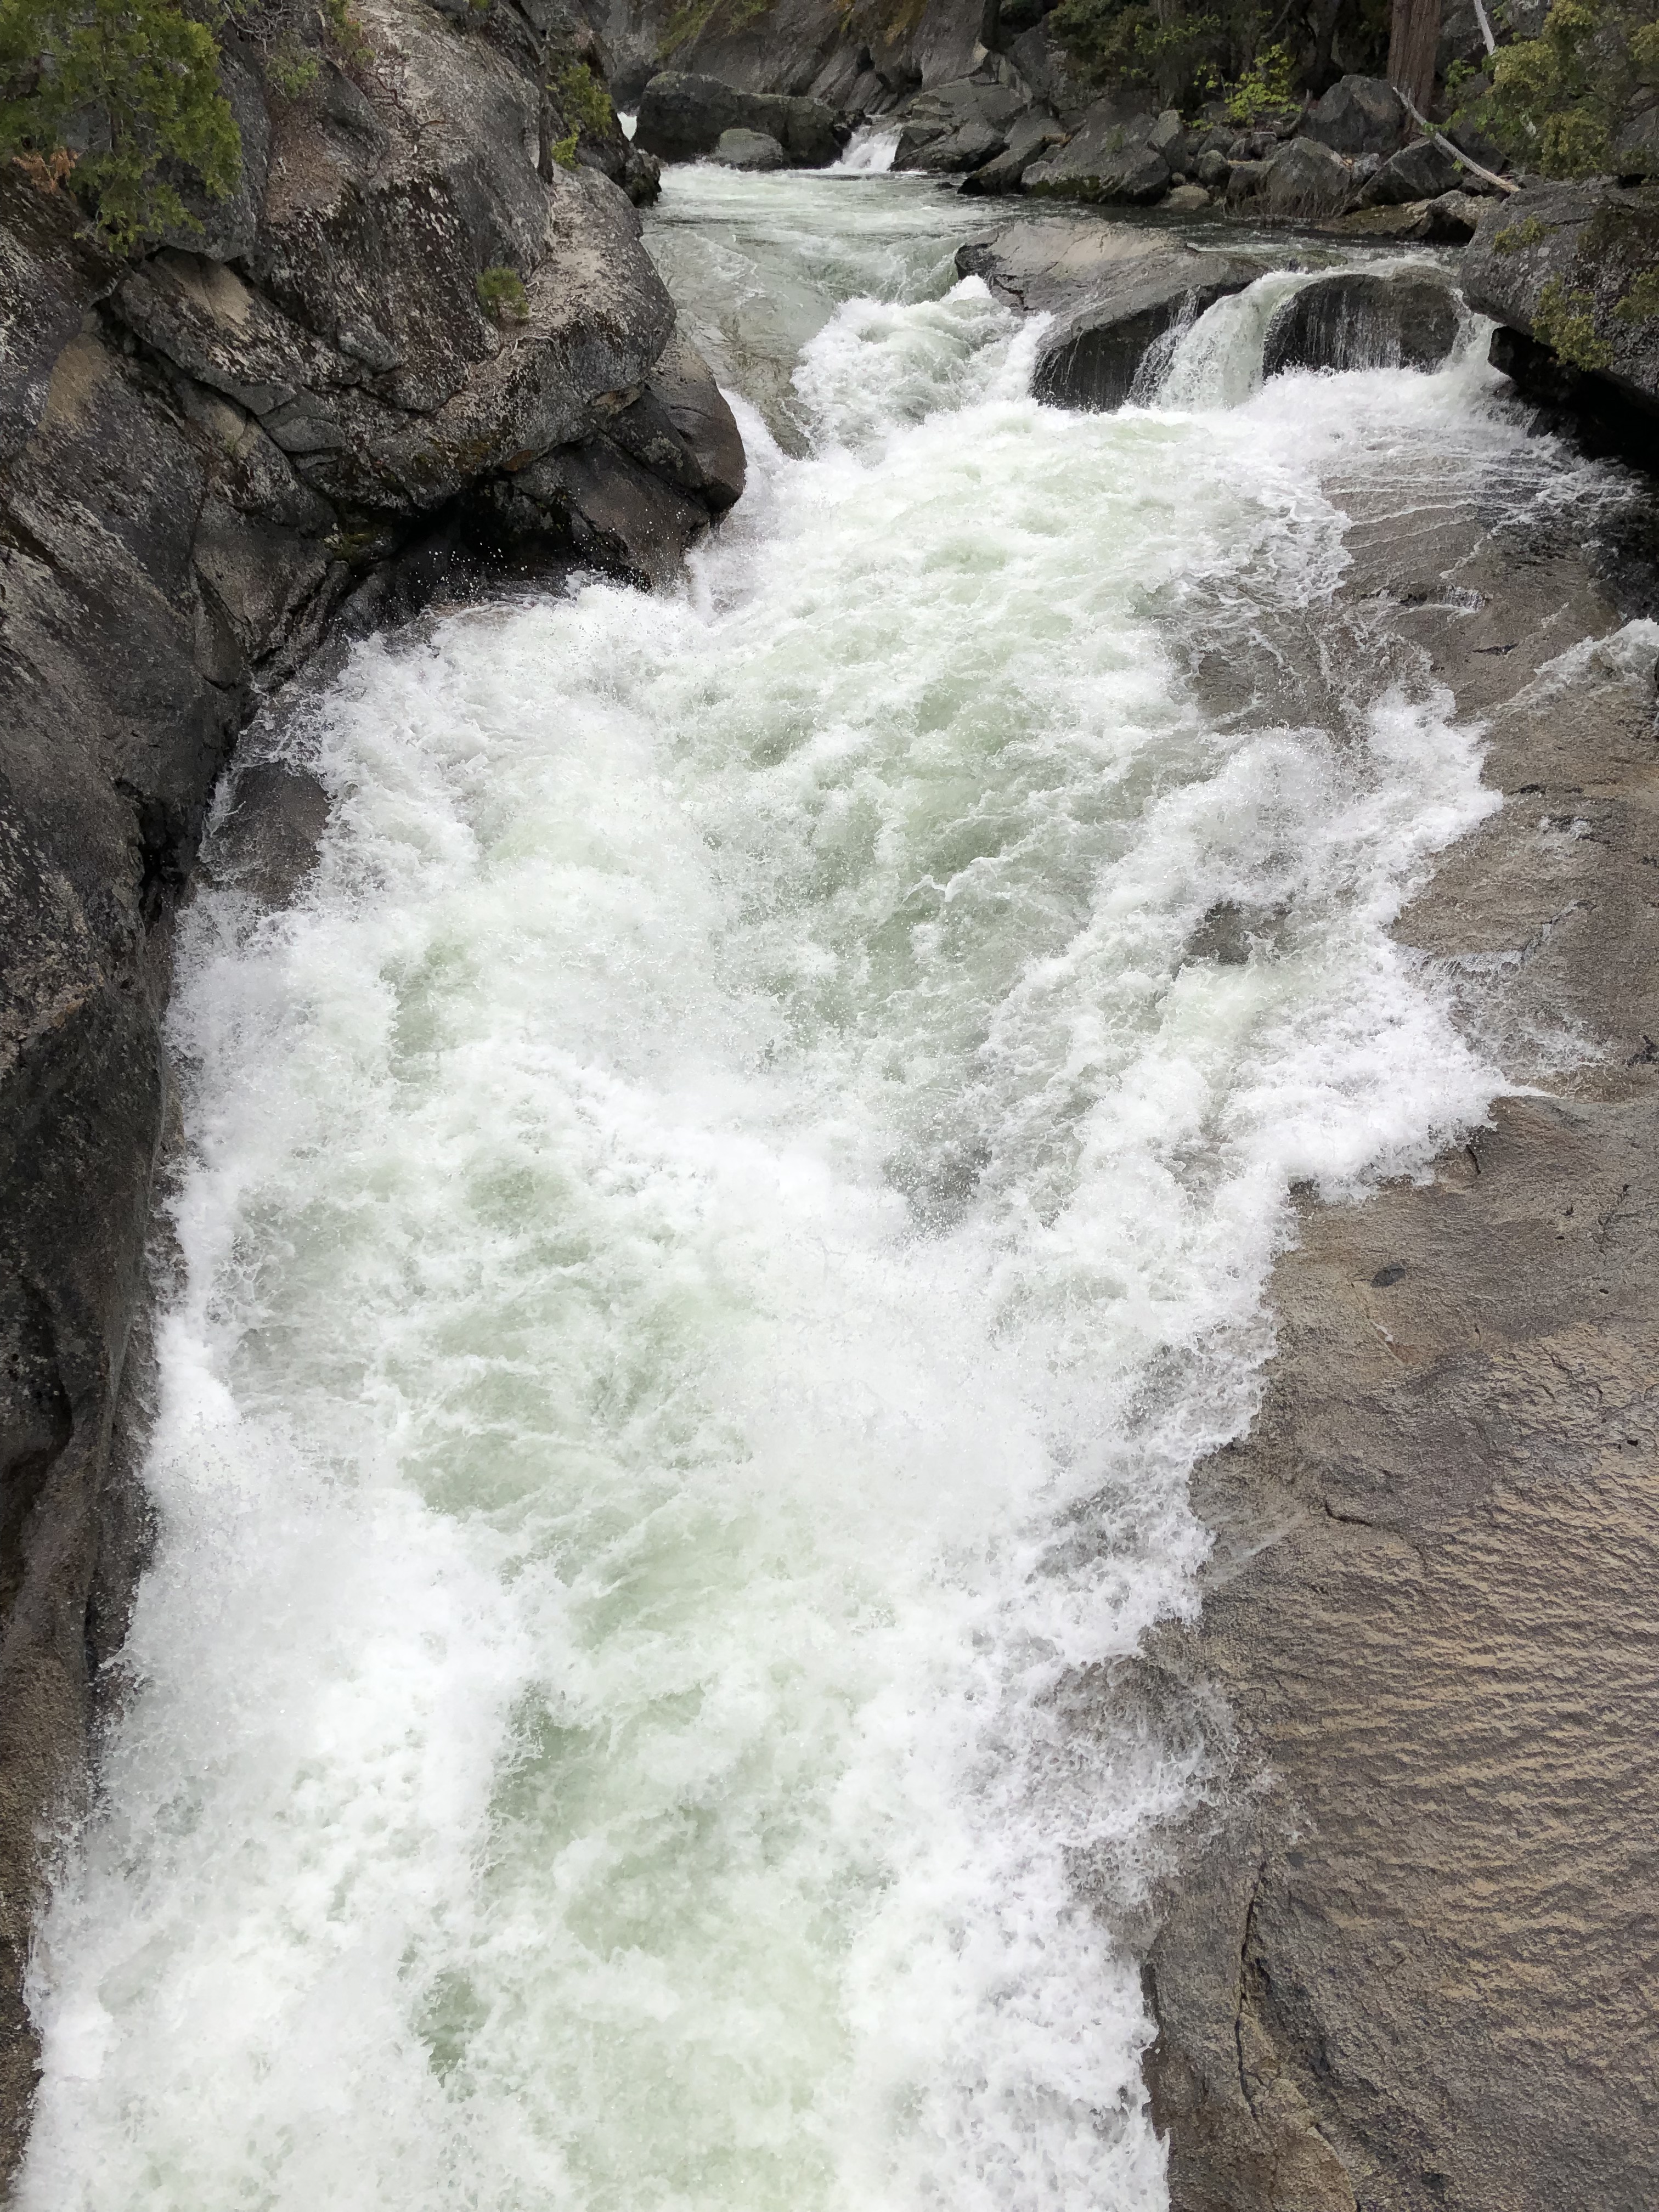
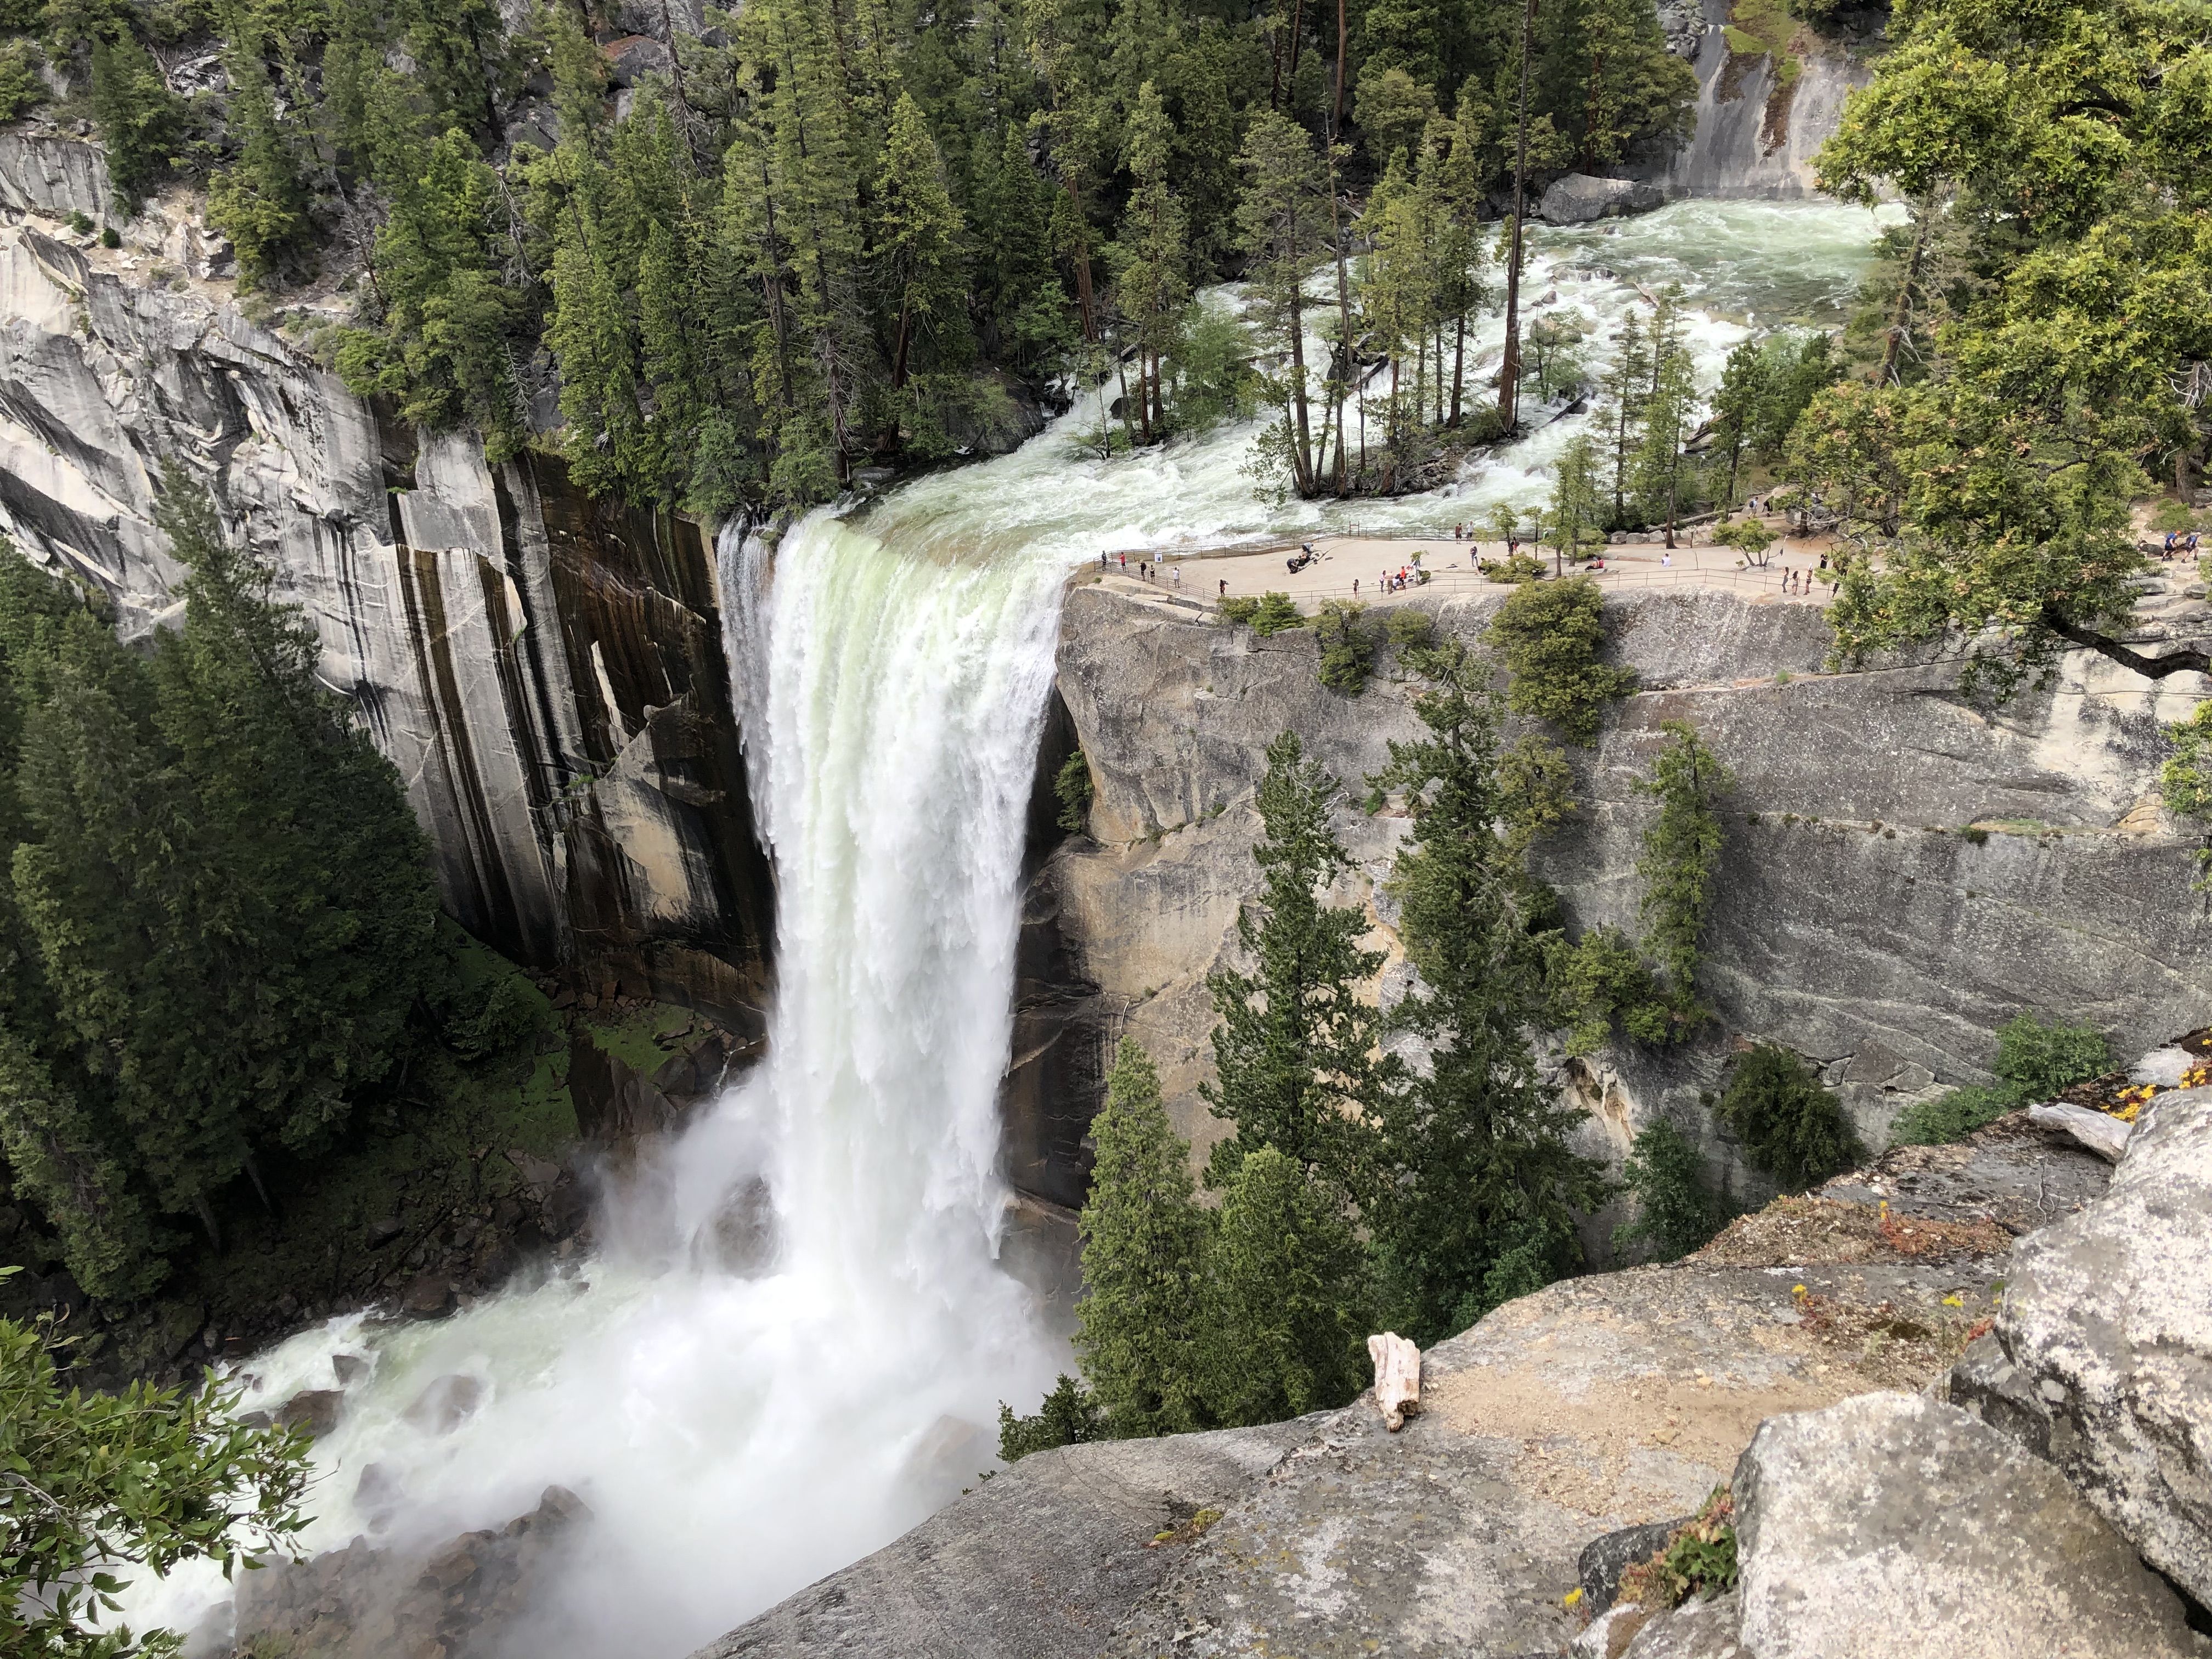
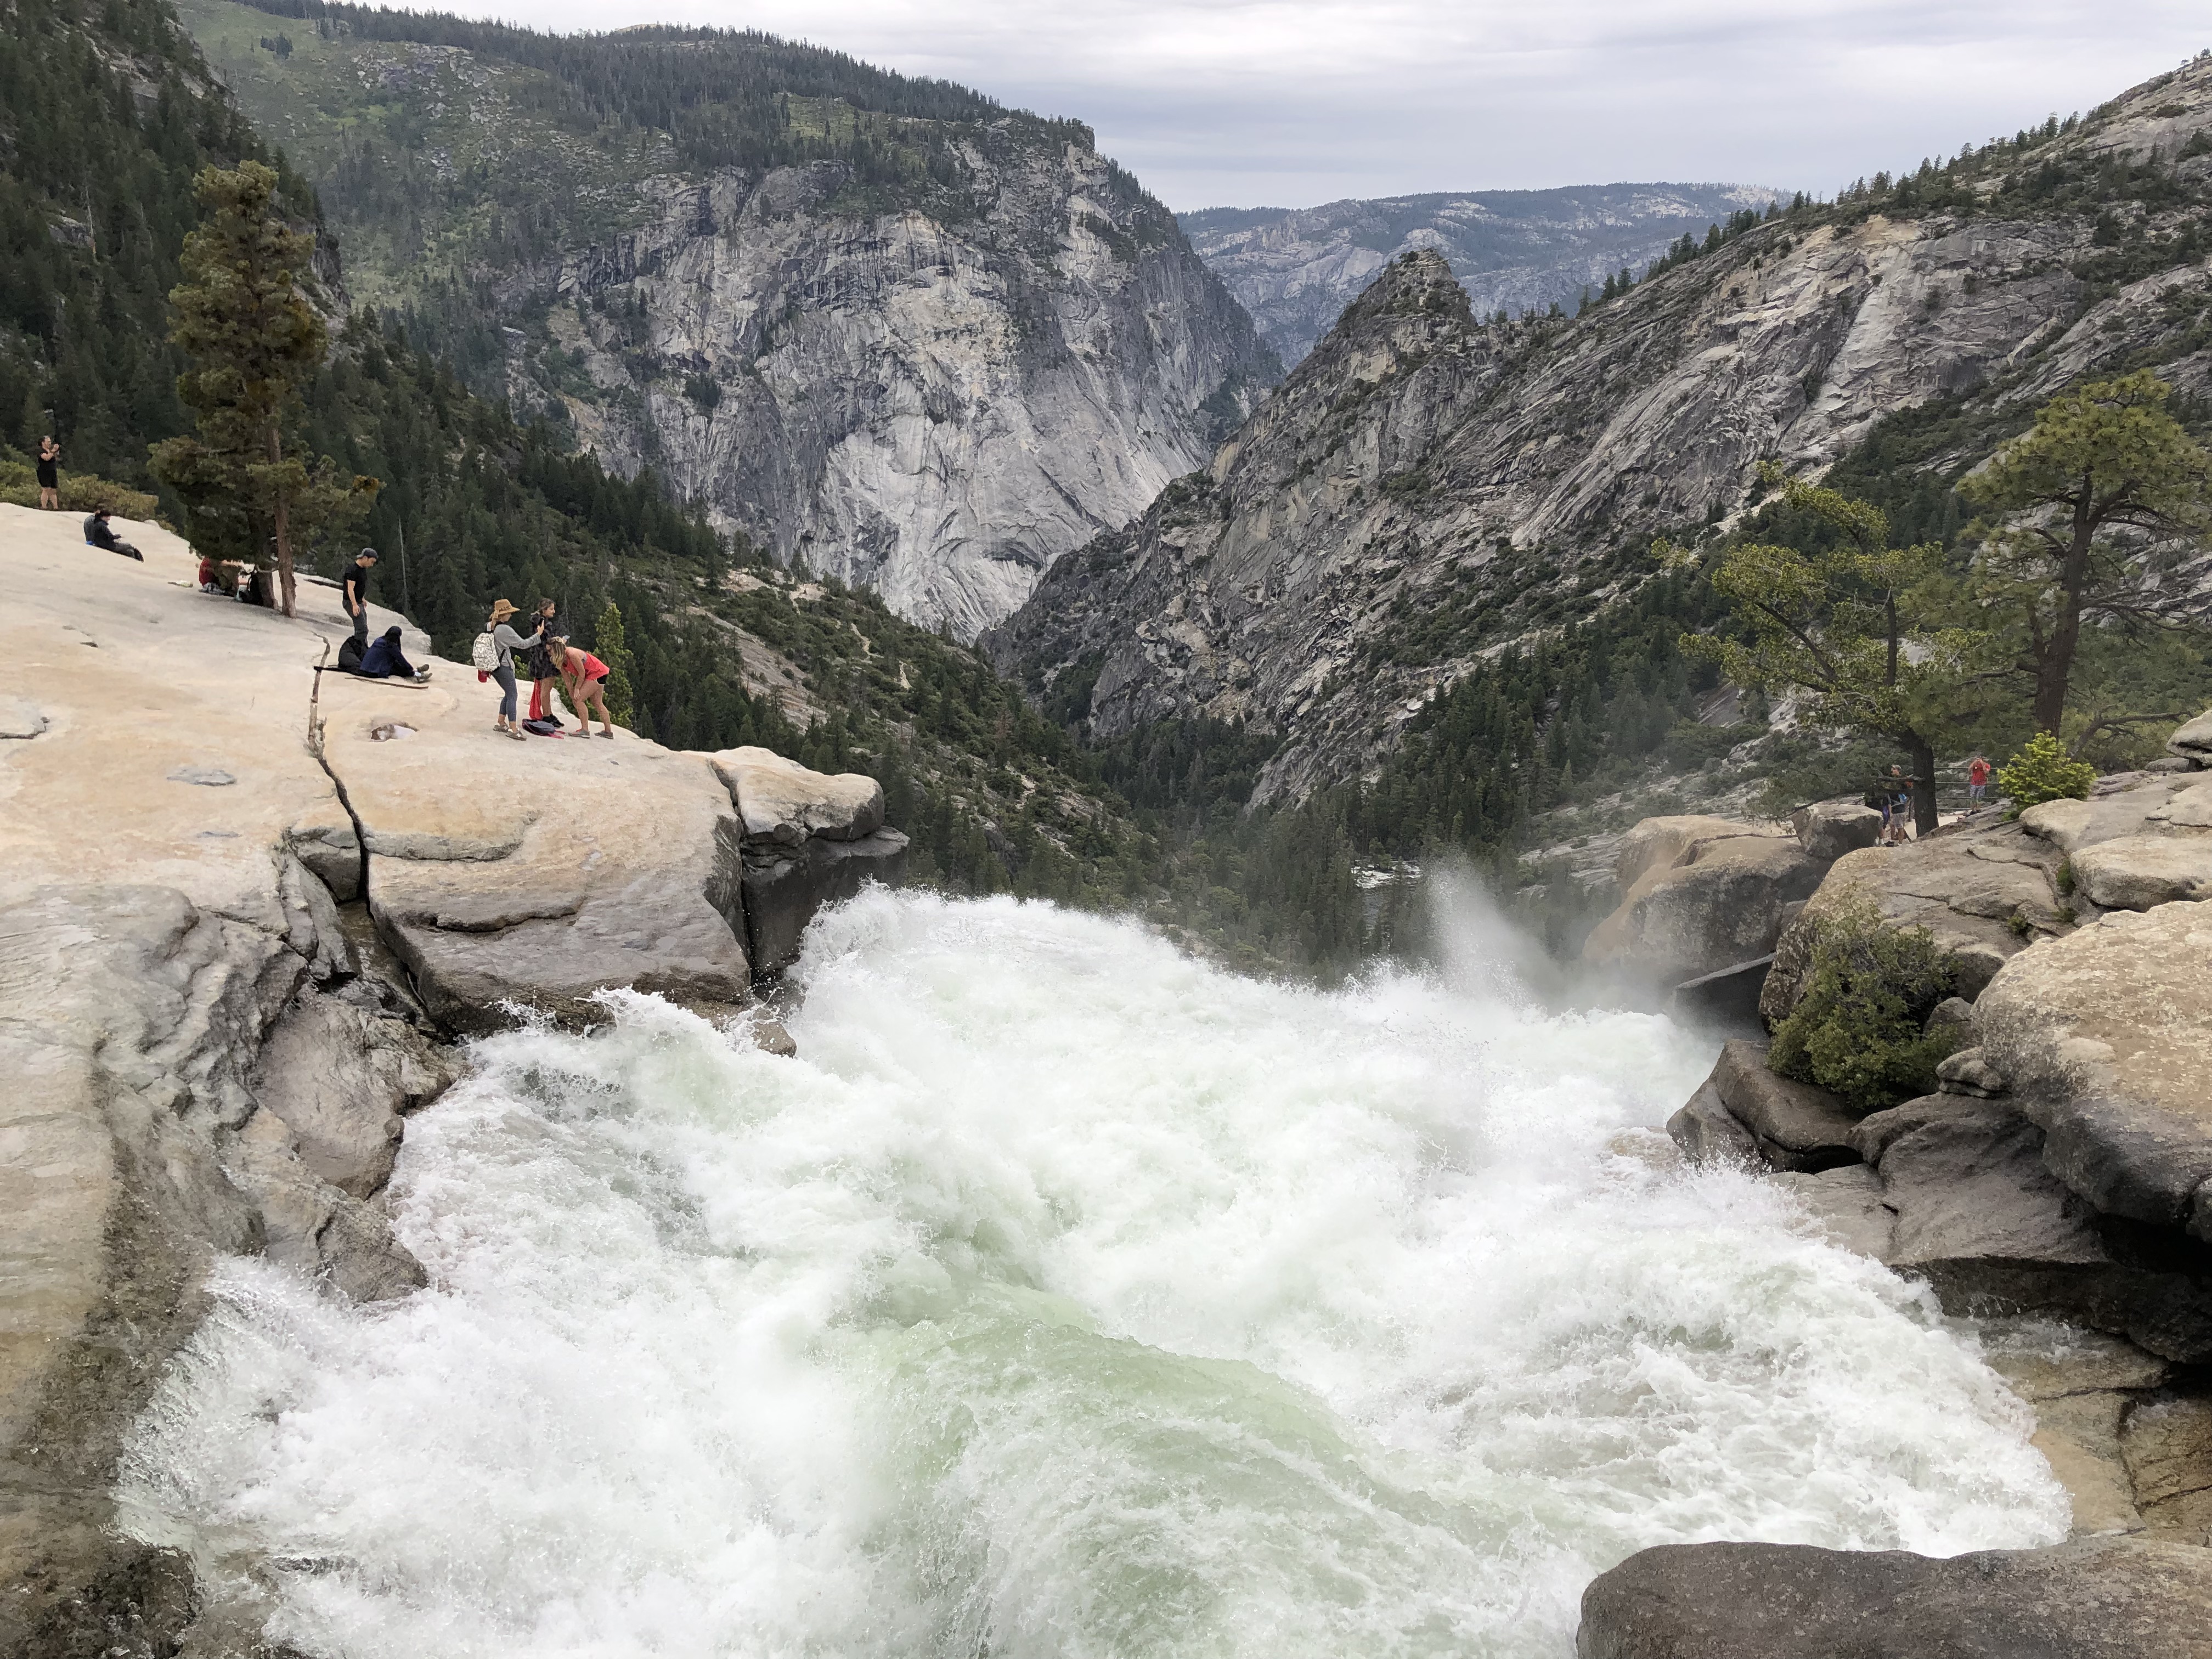
Eventually, you’ll reach the top of Nevada Falls itself! This is my recommended turnaround point for day hikers, since this is the opportunity to make your trip into a loop, and the next destinations are quite a bit further up. There’s a large outcropping overlooking the Nevada Falls as well, which is a great place to rest up or eat something. From here, you have even better views of Liberty Cap, and the valley that the Merced River travels through. There’s no guardrail separating you from the river though, so you’ll need to be careful and not venture near the edge. It’s remarkable how calm and shallow the river is just upstream of the falls, where you can see the bottom clearly and the rocky river bottom casts the water in different colors. However, just ahead of the drop is a churning whirlpool of water, followed by the devastating drop of the falls. While Yosemite Falls gets the crown and fame for being the tallest waterfall in the park, I love this trail for how close you can get to observing both Vernal and Nevada falls, and the unique experience of hiking through the waves of mist generated by Vernal falls.
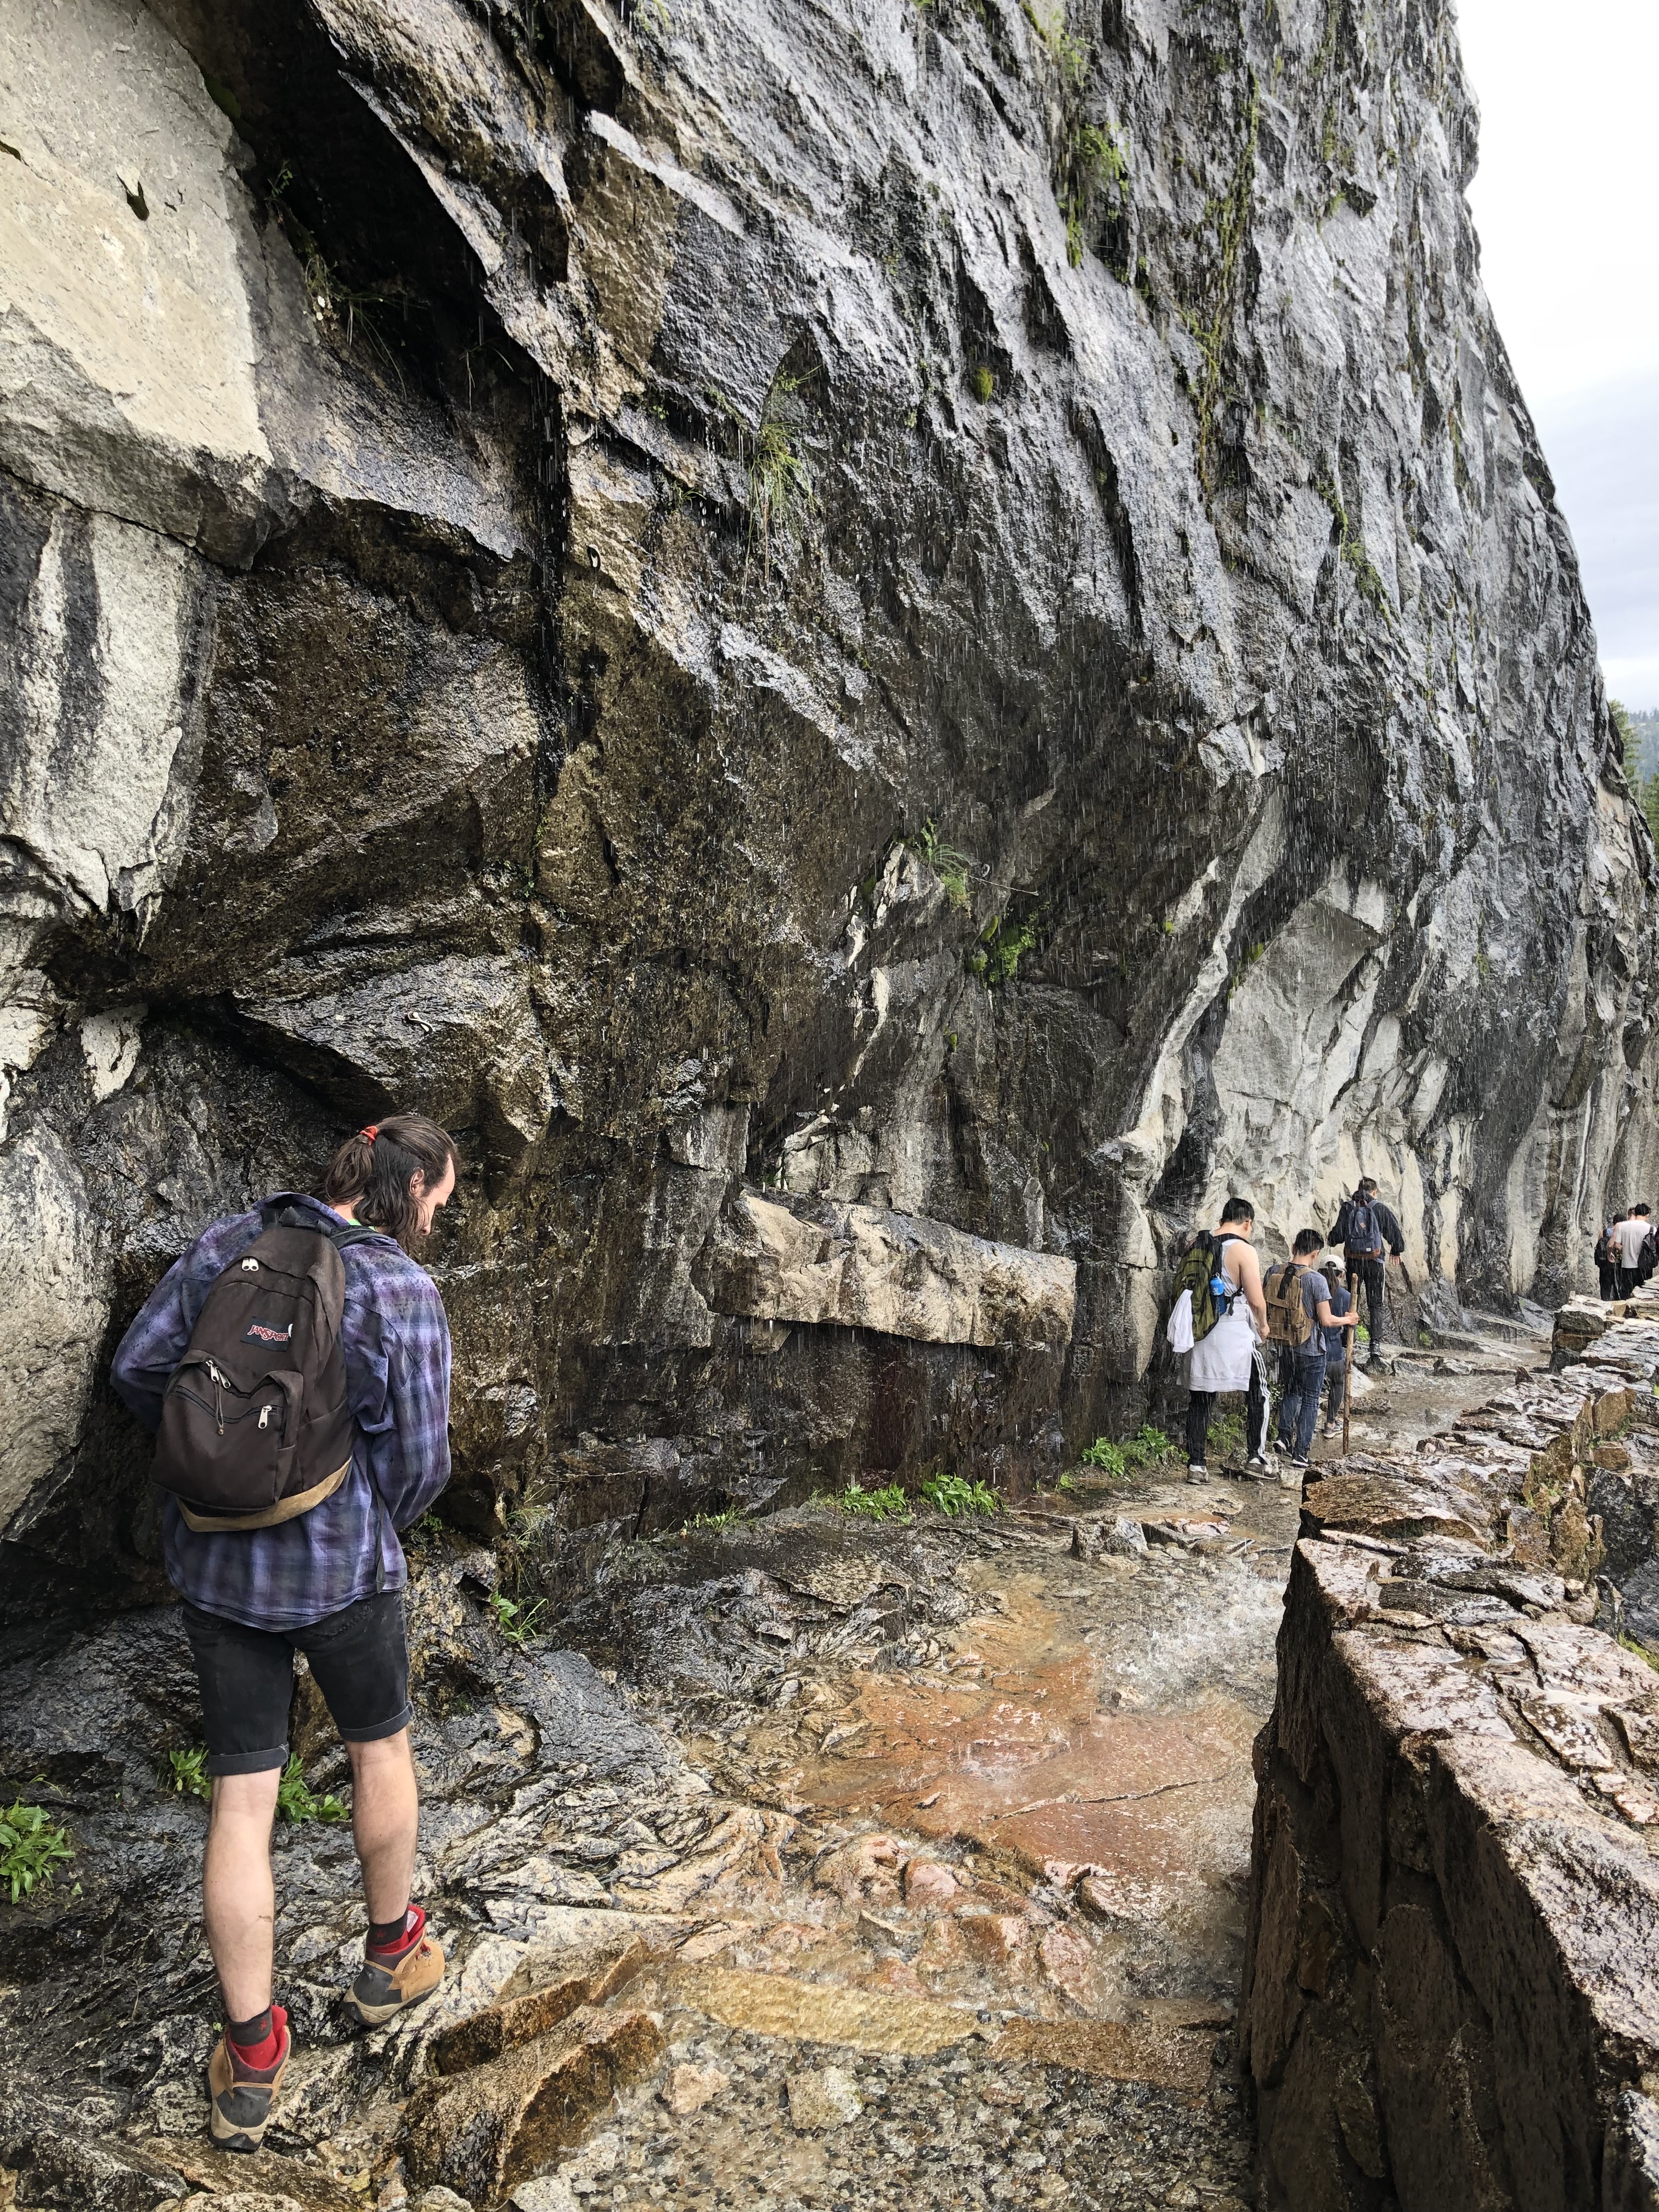
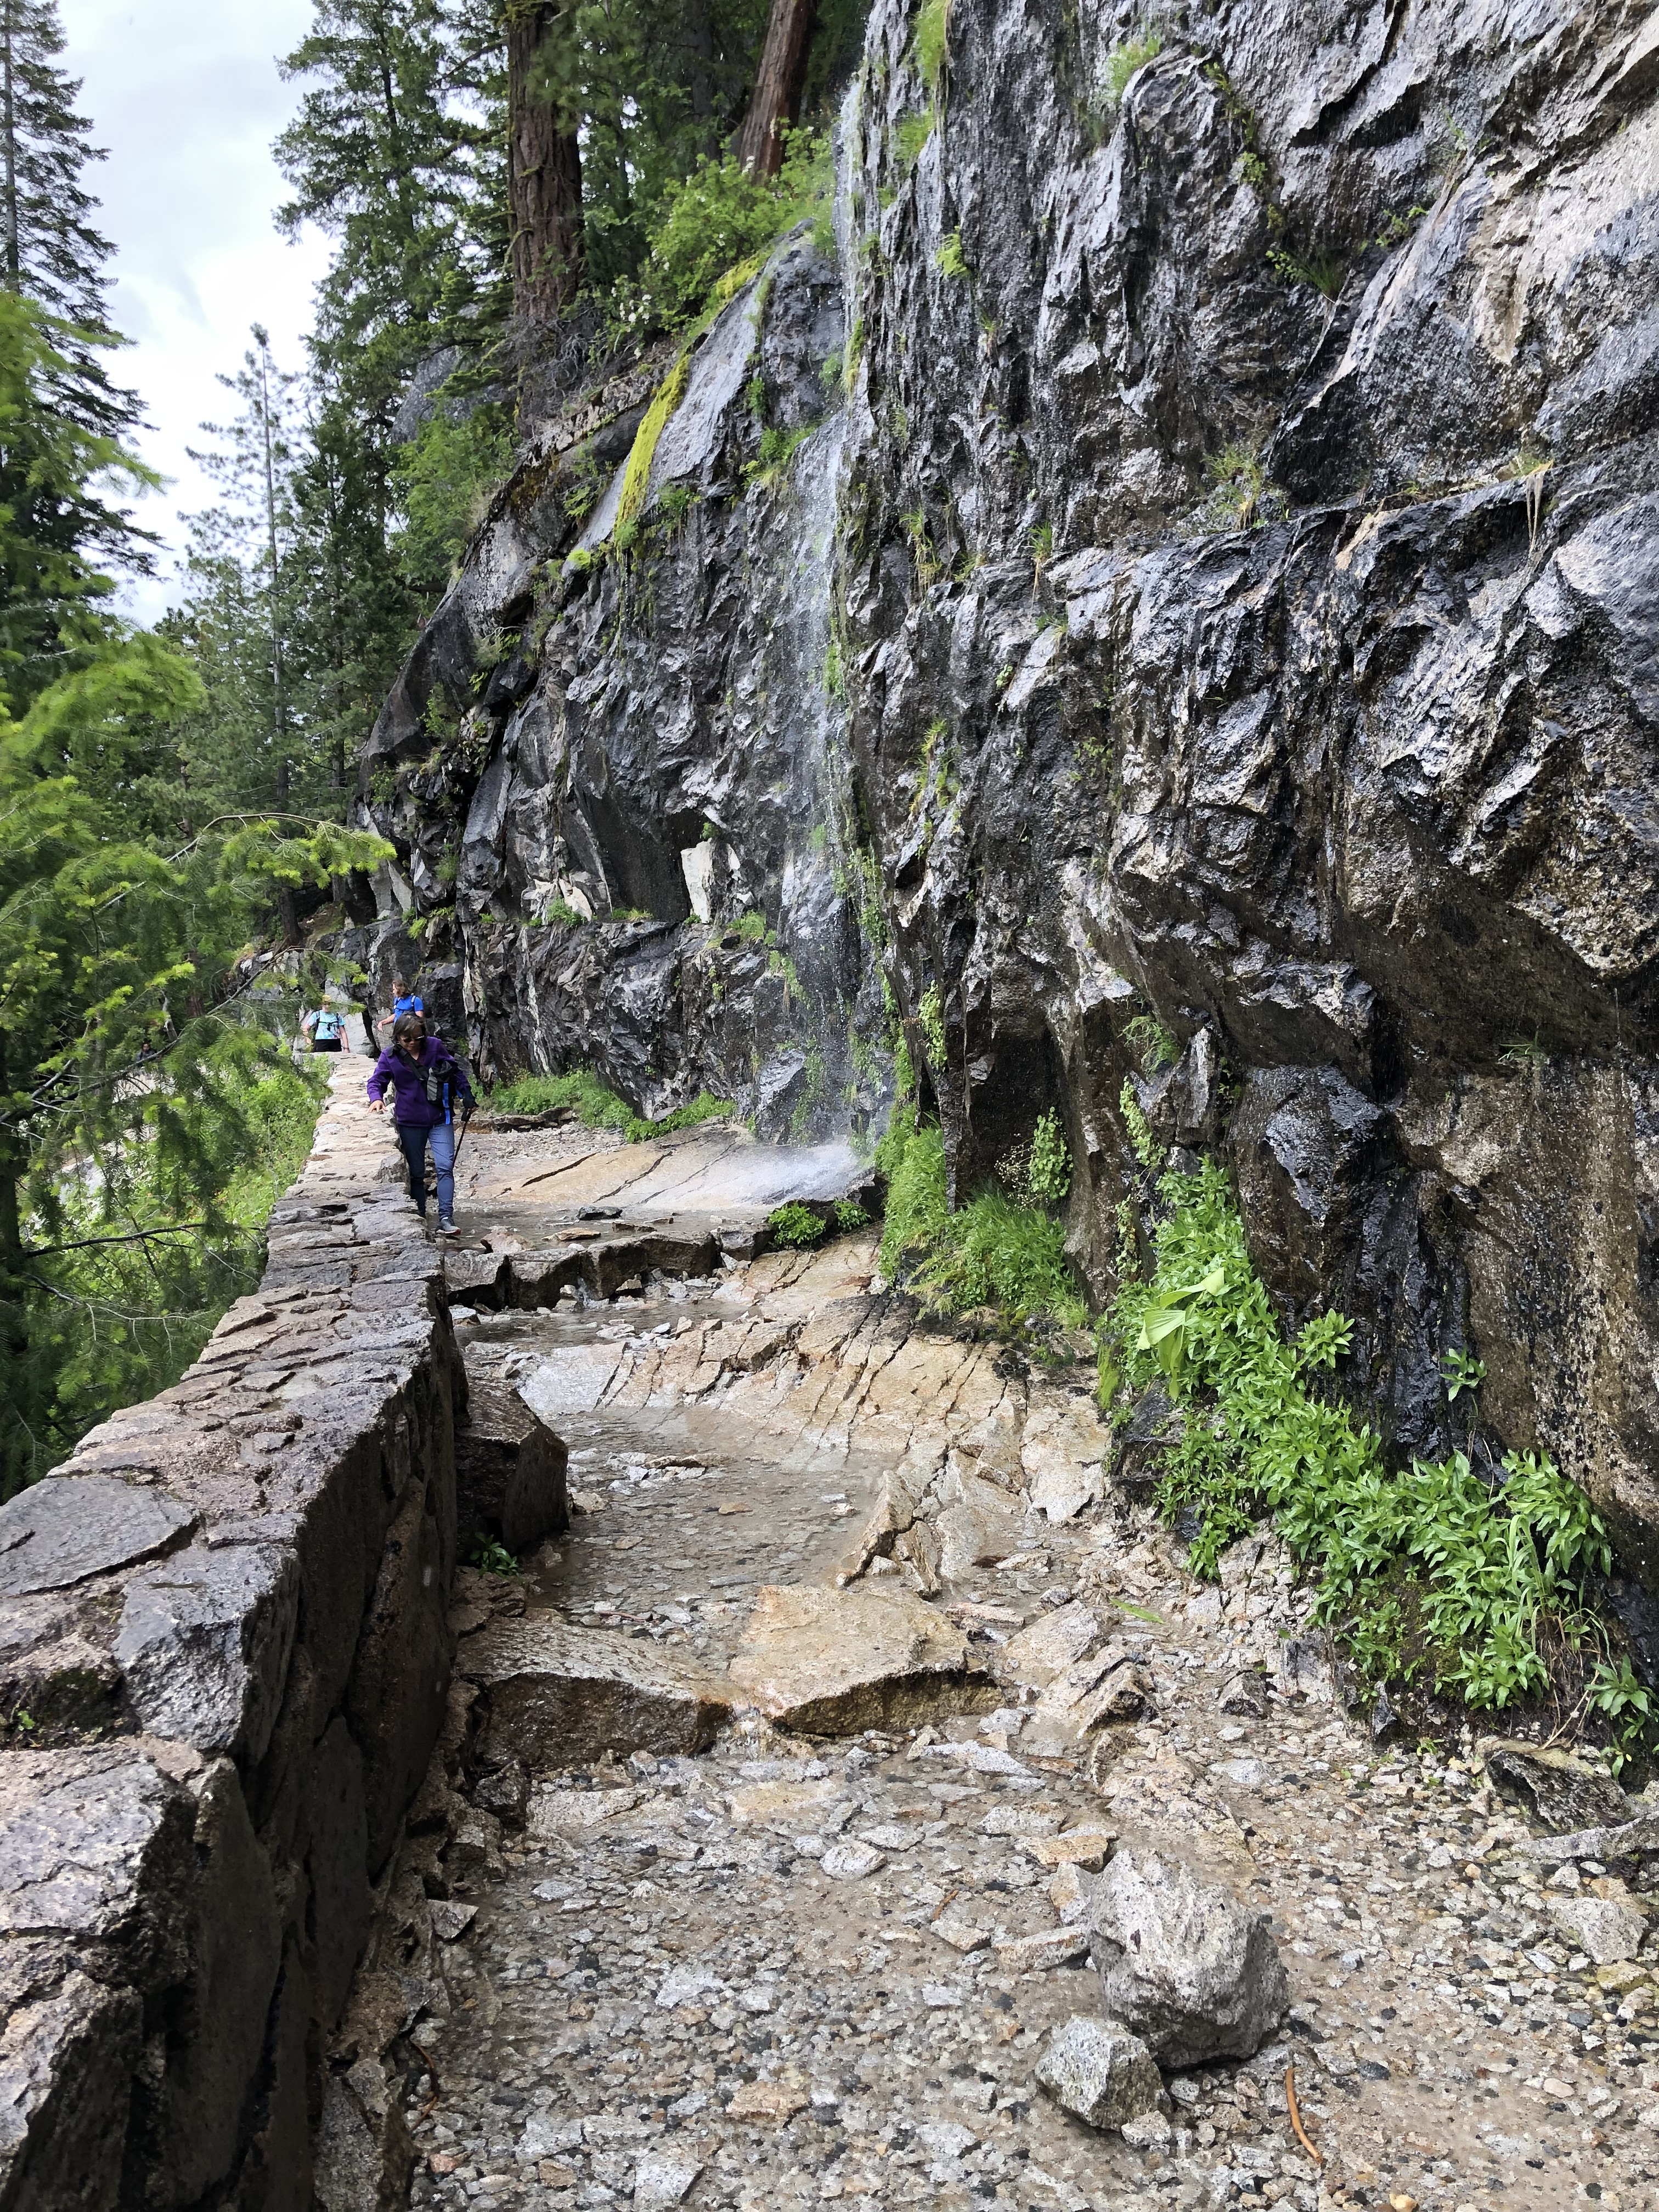
From Nevada Falls, you’ll likely be heading back downhill on the John Muir trail. The first section of this part is the most remarkable, as it features a “weeping wall” that you’ll hike under. You’ll want to secure anything that could be damaged by water, and break out your waterproof clothing again. Unfortunately, there isn’t a good section after this to sun yourself, so you’ll dry off slower than you did after the misty section of the trail. Most of the trail beyond this is a bunch of switchbacks, which will eventually land you at the Vernal Falls bridge and the Happy Isles parking lots and shuttle stops afterwards. This is where you’ll have your best chance to get faraway shots of the two falls, though. You’ll have many chances to photograph Nevada, and then Vernal falls as you descend on the switchbacks. Going down the trail is much faster than ascending it, and hopefully you won’t have that long of a walk or wait for the shuttle back to your car when you return.
So, that’s what my group’s experience on the Mist Trail was like, all the way up to Nevada Falls and back! It’s one of the most popular day hikes in the valley, so you’ll come across it easily when doing your own research on trails. It’s definitely a personal favorite of mine, and I wouldn’t hesitate to take someone here for their first trip into Yosemite Nat’l Park. The cases where I wouldn’t are if they are afraid of heights, or hate getting wet. You’ll also want to make sure your group has the stamina for some steep sections of trail, and about 6 miles of roundtrip hiking to Nevada Falls. And as I’ve said before, find a parking space ahead of the crowds! Conventional wisdom seems to be 9 a.m. or earlier on weekends for trailhead parking, while parking in the valley overall tends to fill between 10 a.m. and 11 a.m. Hopefully you’ll find this guide useful in deciding whether or not to pick this trail for your adventure into Yosemite, and getting an early enough start if you do.
